Hello everyone! I've enjoyed taking a break for awhile and getting ready for the holidays. My Christmas shopping is done and now I'm down to finishing the homemade gifts.
I ran across this fabulous idea on JessicaSprague.com for creating a Travel Game Book. I think it's perfect for a stocking stuffer or to use while you're traveling for the holidays. You can download the printables here for under $3!
I'm not sure when I'll post again. Santa is keeping me very busy. ;)
Wednesday, December 15, 2010
Friday, November 12, 2010
Free Jessica Sprague Class!
If you have never taken an online class from Jessica Sprague, YOU ARE MISSING OUT!!! She is an amazing teacher and now you have a chance to try a class for FREE! Click here for all the details.
Wednesday, November 10, 2010
Folded Paper Flower Tutorial
Interested in learning how to make this beautiful folded flower? Click here.
Wednesday, November 3, 2010
ReThink Your Stamps
Studio Calico has a fabulous tutorial full of unique ways to use your stamps. Check it out here.
Tuesday, November 2, 2010
Pleated Paper Star Tutorial
Here it is...my version of the pleated paper star!
STEP 1:
Cut a 1 1/2" x 12" strip of patterned paper. Score vertically every 1/4". (Notice that's a scoring blade, not a cutting blade). You will have five 12" long scoring marks when you are done.
STEP 2:
Cut the strip into 1 1/2" x 2" pieces. This will give you 6 pieces. You only need 5. Using a fine-tipped red pen and a ruler, draw three lines across the top of each small piece.
STEP 3:
Fold each piece like you would a fan. When the green side is up, the two folds on the ends should be pointing down. This gives you 3 peaks and 2 valleys.
STEP 4:
Using a tiny stapler (like a Tim Holtz Tiny Attacher), staple the end closest to the red lines. Repeat for all five pieces.
STEP 5:
Arrange pieces into the shape of a star and attach to background with glue dots.
STEP 6:
Cover the hole in the center of the star with punched pieces placed on pop dots. Embellish as desired.
Enjoy!
Monday, November 1, 2010
A Holiday Layout
As hard as it may be to believe, Christmas is only 54 days away.
(I KNOW!!)
(I KNOW!!)
In anticipation of the upcoming festivities, we are already designing our holiday classes at Lucky Lark Designs. Here's a closer look at what's in store...
"Believe"
I saw a layout in the November 2010 issue of "Scrapbook Trends" by Tonya Dirk that had a beautiful pleated star and a folded border. I fell in love and decided to try it out. This is my version of the star:
Here's a peek at the folded paper border. (According to "Scrapbook Trends", cut squares or circles from double sided patterned paper, then fold the corners in slightly to reveal the other side. Top with jewels).
I found these beautiful flourish stamps by "Inkadinkado." They have spaces ready for you to place rhinestones of various sizes. I ran out of gems, so I filled in the remaining spots with stickles. I love the final result!
A Santa layout isn't complete without a wishlist. Here's Cameron's:
I will try and post a tutorial for the pleated star tomorrow. Stay tuned!
Tuesday, October 26, 2010
So Loved
A few weeks ago, my brother and his family welcomed a new baby girl into their home. As Baby #6, she had 3 older sisters and 2 older brothers who were anxiously awaiting her arrival.
A few days after her birth, her dad emailed me some photos. As I was scrolling through them, I was delighted in each pose that was the same, except for a different face smiling above hers as they each cradled Baby Lucy in his or her arms. It struck me how lucky she is to be loved by so many people right from the start!
The pictures prompted this "So Loved" layout which I pieced together in a patchwork quilt style. The muted tones and rich colors feel warm and welcoming. I kept the embellishments to a minimum so the focus would remain on the photos.
p.s. The layout really isn't crooked...I just can't take a straight picture.
I've been looking for an excuse to use these beautiful paper roses on a project. I cut out the scalloped peach flower (shown below) using my Silhouette. But you can also create one easily on your own like I did for the ivory flower. Here's a quick tutorial for a spiral cut flower on the Fancy Pants blog. (Scroll down until you seen "Spirals").I love the dimension they add to this layout!
Here's my new "Plants" die from QuicKutz. It's simple and elegant...love it!
Yes, Lucy is definitely loved. Don't you agree?
Supplies Used: Cardstock: DCWV; Patterned Papers: My Minds Eye; Dies: QuicKutz; Border Punch: Fiskars; Journaling Stamp: WRMK; Pin: Making Memories; Butterfly Punches: Fiskars and Marvy; Flower: Prima; Pearls: K&Co.
Wednesday, October 6, 2010
Layout #2
As promised, here is a look at the 2nd class I'm teaching for Cindy's Scrapbooking Conference on October 15th & 16th. It's pretty simple, but our class time only lasts for 1 1/2 hours, so simple is good. :)
One of the hardest things about designing a class is making it versatile enough for everyone's photos. On this layout, you could use six horizontal 4x3 photos (as shown), three 4x6 vertical photos, or a combination of these.
It doesn't really show in the photo, but the striped paper has just the right amount of glitter for a little something extra. The chipboard stars add some dimension and I even popped one of them up further with foam squares.
Banners are always a fun and festive embellishment!
Can I just say I love these colors! So fresh and fun!
If you are in the area, please join us for a fun-filled Girl's Weekend Out!
Tuesday, October 5, 2010
Scrapbooking Conference Coming Up!
It's that time of year again!
Cindy's Scrapbooking is hosting their semi-annual scrapbooking conference in Pocatello, Idaho on October 15th and 16th. If you are in the area, please come join us for a super fun girl's weekend out!
Here's a look at one of the classes I'm teaching there:
I created two one-page layouts with product from the Life Stories collection by My Mind's Eye.
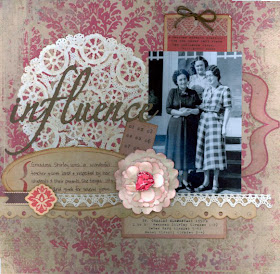
Influence
This is a photo of my grandmother with some fellow school teachers. (She's the one on the left). She was a wonderful teacher and loved by her students.
I used the "Water Distressed" technique for the flower shared here.
I used some of my favorite things on this layout such as the beautiful crocheted lace, some old paper doilies, and my Magnolia Quickutz font.
The colors are showing up a little strange on the picture of this next layout. It is looking a little like smooshed peas, and that is not attractive at all!
Lucy's Homecoming
I have a new niece and she is greatly loved!
Here's a super easy burlap flower I will show you how to make in class. I love the natural touch it adds to the layout.
Love this "Birds on a Wire" border punch by Martha Stewart!
Isn't this "Happiness Meter" so fitting? Love the lace cardstock too.
Stay tuned tomorrow for a look at my next class!
Monday, October 4, 2010
{Not So} Spooky Halloween Layout
Leaves are falling, crops are being harvested, and there's a chill in the air. That means Halloween is on its way!
I created this {not so} spooky layout for my October 14th class at Lucky Lark Designs. It's the perfect design for using up scraps of paper (although I ended up cutting into 12 different sheets of brand new paper). :) You could also use some horizontal 4x3 photos in place of the vertical 4x6 pictures shown on the example.
Our classes have been filling quickly, so if you are interested in attending, please sign up. All the information is available here at Lucky Lark Designs. I have some completed kits for sale as well. That ordering information can be found here.
Happy Fall!
I created this {not so} spooky layout for my October 14th class at Lucky Lark Designs. It's the perfect design for using up scraps of paper (although I ended up cutting into 12 different sheets of brand new paper). :) You could also use some horizontal 4x3 photos in place of the vertical 4x6 pictures shown on the example.
By the way, in case you couldn't tell, Taylor was a Quarterback that year.
When I design a layout, the details are my favorite part. I love adding small accents like the googly eyes and tiny letters.
This is my new Michael's date stamp. I *LOVE* date stamps!
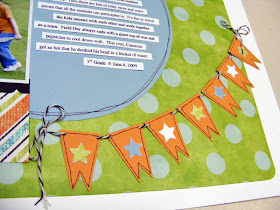
And since we are seeing banners everywhere, why not add one here complete with spooky Halloween icons?
Our classes have been filling quickly, so if you are interested in attending, please sign up. All the information is available here at Lucky Lark Designs. I have some completed kits for sale as well. That ordering information can be found here.
Happy Fall!
Saturday, September 25, 2010
Beautiful Distressed Paper Flowers
Bo Bunny posted a tutorial today on making these gorgeous "Water Distressed Blooms." Be sure to check it out here!
Monday, September 20, 2010
Back to School Layout
I had two purposes for creating this layout:
I made a large pocket using a die cut paper to hold progress reports, newsletters, etc. The 2nd page showcases Cam's spring portrait. This layout is something that can be added to as the school year passes.
This layout is for a class I'm teaching this week for Lucky Lark Designs. If you are interested in any kits, just send an email to orders@luckylarkdesigns.com. If you can't attend the class, you have the option of purchasing a completed kit, which means all the stamping, punching, and die cutting is done for you. All you have to do is assemble the pieces. Easy Peasy!
- I never know what to do with the kids' school portraits when it's time to replace them the next year.
- If your kids are like mine, you always have a plethora of school papers waiting for a home.
I made a large pocket using a die cut paper to hold progress reports, newsletters, etc. The 2nd page showcases Cam's spring portrait. This layout is something that can be added to as the school year passes.
As you may have figured out by now, I love adding little details like the button and string. A project just isn't complete without them!
This layout is for a class I'm teaching this week for Lucky Lark Designs. If you are interested in any kits, just send an email to orders@luckylarkdesigns.com. If you can't attend the class, you have the option of purchasing a completed kit, which means all the stamping, punching, and die cutting is done for you. All you have to do is assemble the pieces. Easy Peasy!
Sunday, September 5, 2010
Crepe Paper Flower Tutorial
As promised, here is the tutorial for making the crepe paper flowers I used on the layout I posted about yesterday.
I purchased a package of crepe paper that came in a big sheet (8 ft x 20 in). I found it in the same section of the store where the tissue paper and gift bags were.
Here's a tip: Don't use a spray mist to color your crepe paper flower. The water content will take the crinkles out of the crepe paper and make a big mess! It might work on tissue paper, though, but I haven't tried it.
I purchased a package of crepe paper that came in a big sheet (8 ft x 20 in). I found it in the same section of the store where the tissue paper and gift bags were.
Start with a strip that measures 4" x 20":
Fold it in half:
Then fold again into thirds:
This is what it looks like folded into thirds and lying flat:
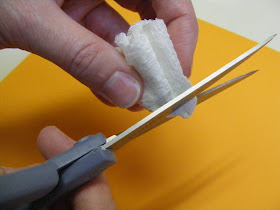
Cut all the layers into a circle. I didn't measure (can you tell?) but it's OK...they don't need to be perfect:
When you are done, you will have 6 circles. (Keep them together in a stack, though).
You can leave them in a circle, or cut a scalloped edge. Again, I just free-handed the scallops:
Punch a 1" circle from cardstock. Add a dab of hot glue or a strong liquid glue (like Diamond Glaze). If you use hot glue, work quickly:
Gather the flower up:
Snip off the bottom:
Press the cut end of the flower into the glue. Let dry:
Spread the layers out and fluff them:
If you want to add a touch of color, sponge a little bit of pigment ink onto the edges of the flower:
Done!
Here's a tip: Don't use a spray mist to color your crepe paper flower. The water content will take the crinkles out of the crepe paper and make a big mess! It might work on tissue paper, though, but I haven't tried it.
Speaking of tissue paper, here are some similar flowers my Mom helped the kids make this summer. She cut circles from colored tissue paper. Instead of gluing them to a base, she poked a hole in the center and threaded a pipe cleaner through. She folded the tip of the pipe cleaner over to keep all the layers into place and covered that up by fluffing the tissue paper in the center.
Don't they look pretty? I love the different colored layers the boys created. See what you could do on a layout or card?


