Wednesday, March 31, 2010

Heartstrings

We just finished celebrating Quilt Week at Porter's. We couldn't let the fabric department have all the fun so we decided to have our own make and take in Scrapbooking. I made this project from a small shadow box frame.


The Graphic 45 papers worked beautifully to create the look of a pieced quilt. And I think the quote about heartstrings finishes it off nicely. I purchased a couple of extra kits since I thought they would make great gifts. So you never know...some lucky family member or friend just might be receiving one someday. :)

Tuesday, March 30, 2010

Happy Spring

Here is a very busy, but very happy layout based on a sketch from the Feb 2010 Creating Keepsakes magazine. I love the bright colors and although red is not a traditional Easter color, I thought it added a fun surprise.


By cropping some of the photos down, I was able to fit 9 pictures on this layout. I'm always looking for way to incorporate lots of pics, especially for holiday events where I seem to end up with way too many!


In the CK article, Kayla Lamoreaux created a digital layout using clothespins to display her tiny pics. I thought it was so fun for a spring look, that I recreated it with actual clothespins from the craft store.


I seem to be getting away from inking all my edges lately. Because there were so many patterns on this page, I decided to define the edges with a journaling pen. It's kind of a fresh, fun look.


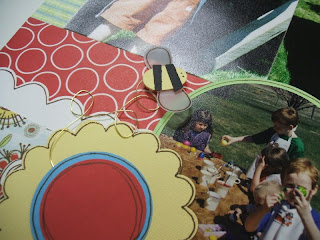
I unearthed this little Pebbles bee die from the forgotten stash at the lss. Isn't he cute? I tried to mimic his flight path with gold wire which I curled and looped. There's also a bee on the 2nd page of the layout. Can you see it?

Saturday, March 13, 2010

My Nearly Perfect Life

I had so much fun making this layout for a class! These are my all time favorite colors, and it makes me happy to look at them. :) The idea for the theme evolved a lot as I was designing it. But in the end, I think I achieved what I was after.

Still photos from Flickr.

Sometimes I get very overwhelmed with all the responsibilities that come from being a wife and mother. It seems so hard sometimes to juggle all the day-to-day tasks between a job, housework, and all the activities in between. I look in magazines and see beautiful homes with sparkling kitchens and think, "That's what I want." However, I don't think those things are real. Not in my world anyway. What IS real to me is my family and the peace I feel in my tiny haven I call home.

Hopefully, my layout conveys a little of all this. I wanted clean lines mixed with shabbiness to symbolize the difference between my idea of perfection and reality. It was fun getting a little messy with the Tim Holtz mask and my favorite color of Glimmer Mist...Olive Vine.

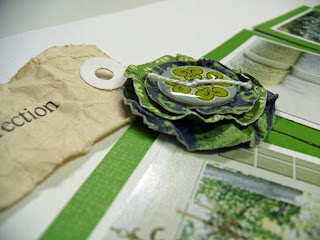
Here are some close ups:


The flowers are super simple to make. Just punch a few different sizes of circles from various patterned papers, spray them with a little water, then crumple. You can speed up the drying process with a heat gun. Add a button or other embellishment in the center and sew all the layers together with a little floss tied into a knot. Voila! Wonderfully shabby flowers!

I crumpled the tags too and then sewed them on with my machine.


These Heidi Swapp stamps are some of my favorites. I embossed the title with American Crafts Zing embossing powder.


I printed my journaling onto vellum, then crumpled it all up. Vellum kind of tears when crumpled, but it just added to the shabbiness. I cut my journaling into strips and machine stitched them directly to the background. That eliminates the never-ending problem of how to attach vellum without seeing the adhesive.

Well, that's my version of my nearly perfect life. What's yours?

Tuesday, March 9, 2010

Family Tree Shadow Box

A couple of weekends ago I got to work with the beautiful new "Lush" collection by My Mind's Eye. I *Love* the gorgeous flocked papers, the classic patterns, and the rich looking embellishments. (My favorites are the flocked alphabets and the velvet ribbons). This line comes in 6 colors...black, brown, blue, green, pink, and red.

I had so much fun mixing the green and blue collections together for this family tree project! The hardest part was finding and editing all the photos. After that, the rest came together pretty quickly.


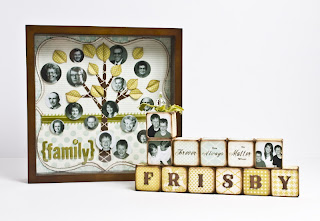
I used three different sizes of circles punches for the photos. The leaves started out as circles too, and then I just hand trimmed each one into a leaf shape, folded them down the center, and inked. Some of the photos are on pop dots and others aren't (in a random sort of way). ;)

*Here's a little tip: I have always kept a scalloped paper on hand to use as a pattern when needed. Many different companies make them in various shapes like this or this.


I decorated some wooden photo blocks that measure 2x2. I thought they could stand alone or be displayed next to the shadow box. I covered all 6 sides of each block with paper, then inked around the edges. The "knob" was made by threading beads onto a corsage pin. Then I drilled a hole in the top of the block by pounding a nail into it and removing it. I glued the pin with the beads into place with Diamond Glaze and finished it off with a little ribbon.


Here's what they look like displayed all together:
I have plans for a very girly layout using the pink collection and the Donna Salazar flowers. Hopefully I will be able to work on it soon!

Friday, March 5, 2010

Gorgeous Paper Flowers!

I am soooo going to make these flowers by Donna Salazar! Check out a video tutorial here. I will post my results soon.