Monday, May 31, 2010

My Classes for the Weekend Scrappy Conference

Here's a peek at the two classes I'm teaching this weekend at Cindy's Scrapbooking Conference in Pocatello. If anyone out there wants to attend, please join us! It's so much fun (not that I ever seem to get much scrapping done). :)

This year I'm doing a "boy" class and a "girl" class.

The first one is "On the Go." I used Fancy Pants papers and some punches and die cuts.

To make the tire marks, I ran my son's Lego car through a black ink pad, then ran it across my page. Easy! (Although Taylor wasn't sure what to think of my technique).


I love all the cute Fancy Pants elements that match the paper...


Here's the girly layout. These are 3 of my nieces:


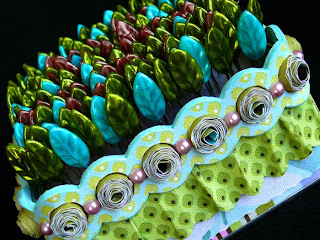
Remember the rolled flower technique I linked to here? I used a QuicKutz scalloped border die and cut it in half lengthwise. Then I rolled the paper tightly before letting it come undone a little. I finished it off by gluing the end. It's a really easy technique and oh so cute! (I think it looks super cute with double-sided paper because you get a glimpse of both patterns).

Then in my class at Porter's last week, one of my customers showed me how to make this darling muslin flower. I'll post a tutorial tomorrow, so stay tuned!

Well, back to the kit making! See you tomorrow!

Saturday, May 29, 2010

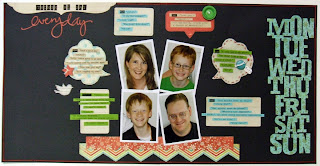
Things We Say Everyday

This layout was so fun to make! I involved the kids in trying to figure out what phrases we all say on a regular basis. I kept notes in a small tablet, and throughout the week we would add something else we thought of. It was so fun! We would be in the middle of a conversation, and suddenly one of the boys would point and say, "You say that all the time!" LOL! Good times!

I used the new So Sophie line from My Mind's Eye. Love, love, love this collection!!!

I used lots of die cuts and punches. I die cut one of the conversation bubbles from felt to add texture.
And I even dusted off my Silhouette to cut the "Days of the Week" border and the "Everyday" title. I forgot how much fun that machine is to use! (Note to self: Must use it more often). There are so many (as in hundreds and hundreds) of designs you can download from the Silhouette website to cut out. They can be re-sized to custom fit your project and are very affordable.


For a finishing touch, I made big 12" long stitches along the edges of the layout. I think the red color really pops against the black background.

So how about it? Why not document habits or sayings or anything else that's part of your "everyday." I think those are some of the funniest things to look back on and remember...

Wednesday, May 26, 2010

Miniature Banner

I'm really in love with all things Maya Road right now. Here's another darling project by Melissa Phillips that I swiped off the MR blog today. Check it out here.


I'm feverishly working on more projects at home, both for Porter's and for Cindy's scrapbooking conference coming up on June 4th and 5th. I'm so excited for the conference, but there's always lots of work to do to get ready. I am teaching some classes there and will also have some kits for sale. I will post those over the next few days. So until then, happy scrapping!

Saturday, May 22, 2010

Super Cute Storage Idea

Check out this darling idea for storing trinket pins designed by Jennifer Beason. For more pics and full instructions on how to make it, head on over the the Maya Road blog. There's lots more scrappy goodness, so be sure to browse while you're there. :)

p.s. I love how Jennifer made the rolled scalloped flowers. How cute would those be on a layout or card?

Friday, May 21, 2010

More Free Vintage Clip Art

Check out The Graphics Fairy for some cool FREE vintage clip art and wonderful project ideas. I'm in love!

Thursday, May 20, 2010

Tulle Flowers Tutorial

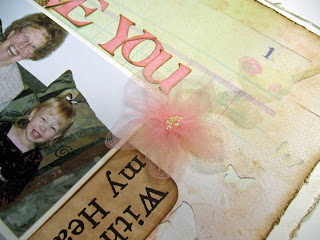
We just received some new 7 Gypsies papers in the store a couple of weeks ago and I could hardly wait to play! I love the shabby, vintage feel to them.


Here's a close up of the tulle flower I made in under 10 minutes:


I started with a roll of pink tulle which I found in the wedding section of Porter's. You can also find tulle by the yard in fabric stores. You will want to use clear or matching thread for your project.

1. Cut 5 ovals that are all the same size:


2. Fold the first oval in half lengthwise.
3. Thread a needle (double your thread) and tie a knot in the end. Make a stitch through the tulle, but don't pull it all the way since the knot would just pull through the holes in the tulle. Loop the needle through the opening in the thread near the knot and pull tight:


4. Make a basting stitch along the curved edge:

5. Then pull tight. This creates one petal:


6. Without knotting or clipping your thread, repeat steps 2, 4, and 5.


7. Continue adding petals until all 5 are gathered:


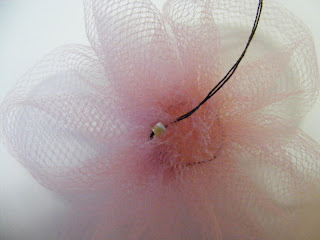
8. If desired, add some beads to your thread and sew them to the center of the flower:


9. Knot the end of your thread when finished:


These flowers make the cutest hair bows as well as accents for many crafting projects. You can make them as large or small as you like. Experiment and have fun!

Wednesday, May 19, 2010

Fabric Flowers Tutorial

Fabric flowers are all the rage right now. You can see them practically everywhere you look whether they are adorning someone's hair, tote bag, or crafting project. So why not add some to a layout or card?

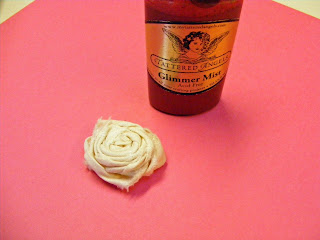
I made one from muslin and colored it with Glimmer Mist for this layout. To find out how to create one of your own, read on...

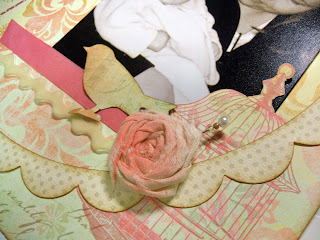

Click on any of the pictures for a larger view.

I started with a piece of torn muslin approximately 1" wide and 1 yard long:


Fold the muslin in half so both torn edges are together. (You don't have to fold the whole length in half at once...just fold as you go):
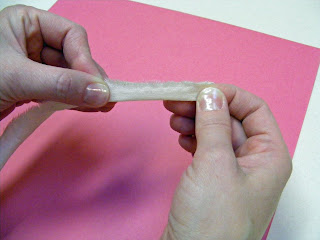

Start rolling from one end and roll 4 or 5 times. This will be the center of the flower. Since I'm right-handed, I started rolling from the right end with the raw torn edges at the top :
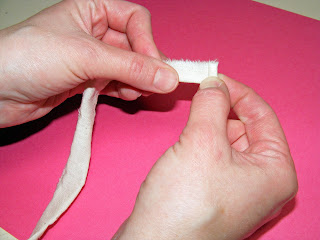


Holding the roll firmly, flip it to your other hand with the raw edges still at the top:
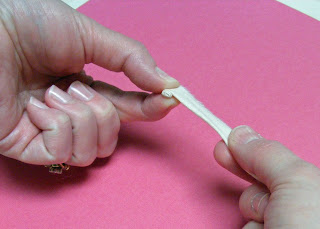

Create a half twist in the fabric and then wrap it around the small roll you created: Continue twisting and wrapping as you work your way around the flower center:
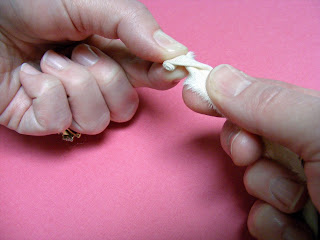


Here's what mine looks like from the top after a few times of twisting and wrapping:
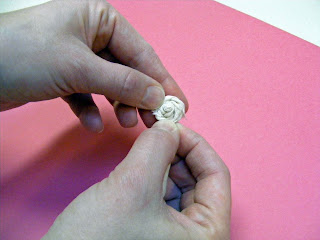


Continue twisting and wrapping until your flower is the size you want it:


When you reach the end of the fabric, your flower should look something like this:


Temporarily pin fabric into place with a corsage pin or long needle:

With the large pin still in place, take a needle and thread and stitch back and forth across the back of the flower. Be sure to catch all the loose layers so they stay in place. (I've used dark thread so you can see what I've done. You will want to use white or ivory thread so it doesn't show):


Here's a look at the very ugly back of my flower, but hey...it's all secure! (p.s. make sure you leave yourself enough thread to tie a knot). ;)
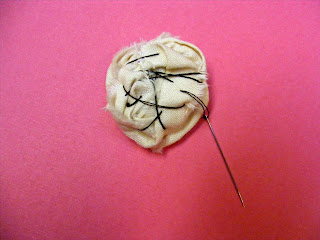

Spritz the top of the flower with Glimmer Mist. Don't overdo it...just 2 or 3 sprays is all you need:

Ta da!! I added a couple of beads to a corsage pin and used it to adorn my flower:

Check back tomorrow for a tutorial on tulle flowers. These are perfect for hair bows as well as scrappy projects!

Tuesday, May 18, 2010

Monograms

I was inspired by a layout in Scrapbook Trends to create a layout using a large monogram. We have a giant set of alphabet dies at the store that I used, but you could also create your own in Word or by using an electronic die cut machine, stencils, etc.

I used some paper by Cosmo Cricket and Jenni Bowlin. The journaling card is by My Mind's Eye.

I love little Tim Holtz charms, especially for boy layouts. The metal accent adds a touch of masculinity.


I haven't used my "Binding Edge" punch for awhile, so I thought I'd dust it off for this layout.

This layout ended up being pretty fast and simple. Sometimes that's nice. :)

Monday, May 17, 2010

Scrapping Collections

Cameron has been wanting me to make a layout about his collection of Webkinz for a long time. So we finally decided to do it and set up a little photo shoot.

I was completely inspired by a layout on 2 Peas by Nichol Magouirk. My layout pretty much ended up being a scraplift of hers because it worked out so perfectly!


I created the conversation bubbles in Word and had Cam write about his pets in his own handwriting. He was so excited to help! This layout would be a great way to document the different things your kids collect. You could also scrap about your daily routine and what activities you participate in on a weekly basis. Just some fun ideas to maybe jump start your creativity a little...

As a side note, I want to share this fun collection I used from We R Memory Keepers called "72 and Sunny." I LOVE these bright colors! The color palette, designs, and fonts are so retro and remind me of when I was a child.

There are also clear acrylic stamps, 3-D chipboard stickers, pre-stitched matching cardstock, shaped papers, and some coordinating paper kits. Be sure to check them out!

Sunday, May 16, 2010

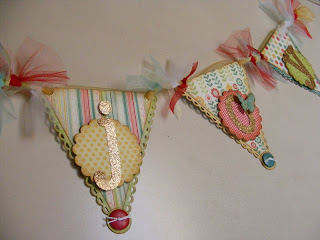
Springtime Banner

Many of you may be thinking Summer is just around the corner. But here in Idaho, we are still trying to figure out if it's done snowing or not. To help brighten up my home (despite the weather outside) I created a simple banner for a project at the store for National Scrapbook Day.

The Quite Contrary collection from My Mind's Eye was one of my favorite releases this spring. The colors are bright and the patterns are so sweet and easy to work with. Here's what I came up with:

I used lots of punches and die cuts, which makes for a fast and each project!

The letters are die cut from glitter paper. It is the cheaters way out of a big glittery mess! ;)

I placed many of the layers on pop dots to create lots of dimension.

You could easily substitute letters to spell anything you wanted and also add more pennants to make it longer. It would be a fun decoration for a child's room or your creative corner.