


5 months ago
Saturday, November 28, 2009
AMAZING Paper Piecing on Ebay!
Quick! Look at this amazing paper piecing on eBay before it's gone! This woman truly has a knack for details. I looked and looked at her photos but was still surprised with the tiny details still to be discovered after reading her descriptions of each page. It's a beautiful piece of art! I think it would be cool if this was photographed and made into a children's book with peek-a-boo flaps and hidden elements. It could keep a child busy for hours!
Monday, November 23, 2009
St. Nick is Here!
As promised, here's a look at some fun Christmas projects I made this weekend using Bo Bunny's St. Nick collection. I love the vintage Santas and the pretty patterns as well as the rich colors.
Maureen Wilson, a member of the Porter's design team, created a project last year using a wooden "Joy" and a mat and frame. I was assigned to make another one this year using a different collection of papers and stickers. Here's how it turned out:

 Surprisingly, this project was easy to make and only took a short amount of time. You can easily alter the look by using different papers and stickers or changing the mat and/or frame.
My next project was this fun Christmas banner. (Check out the December issue of Simply Handmade for step by step instructions for making a similar one).
 I love how versatile banners can be. You can create some for holidays, birthdays, and other family celebrations. Here's a brief overview of how to make one:
Start with a chipboard base and cut into as many triangles as you would like. I found the perfect triangle pattern on the Maya Road website here. (Just scroll down until you find the "Book Templates." Then click on the triangle shaped book and a PDF file will pop up that you can print out).
Decorate the chipboard with bits of patterned paper, rick rack, and ribbon. Die cut stars (or any other shape) and letters to spell anything you would like.
 I discovered a super easy way to attach glitter to the die cut letters without making a big mess. First, die cut your letters from cardstock. Then, run them upside down through a Xyron sticker maker. This will attach adhesive to the front of the letter.
 Then sprinkle them with glitter and shake off the excess. It's as easy as can be and virtually mess free! (I loved the Martha Stewart glitter for this project).
 Attach the banner together with wire or ribbon. You can leave a little space in between each pennant for tying bits of lace and ribbon if desired. Attach part of a Christmas pick to each end and finish off with some more pretty ribbons.
(I apologize for the quality of these photos. They were taken in the basement of the store and the lighting there was horrible)!
 Bo Bunny's "Buttons and Bling" were perfect for creating this little tree embellishment. There were still plenty of buttons left over that I plan to use on some Christmas cards later.
 Happy Scrapping!
Maureen Wilson, a member of the Porter's design team, created a project last year using a wooden "Joy" and a mat and frame. I was assigned to make another one this year using a different collection of papers and stickers. Here's how it turned out:

 Surprisingly, this project was easy to make and only took a short amount of time. You can easily alter the look by using different papers and stickers or changing the mat and/or frame.
My next project was this fun Christmas banner. (Check out the December issue of Simply Handmade for step by step instructions for making a similar one).
 I love how versatile banners can be. You can create some for holidays, birthdays, and other family celebrations. Here's a brief overview of how to make one:
Start with a chipboard base and cut into as many triangles as you would like. I found the perfect triangle pattern on the Maya Road website here. (Just scroll down until you find the "Book Templates." Then click on the triangle shaped book and a PDF file will pop up that you can print out).
Decorate the chipboard with bits of patterned paper, rick rack, and ribbon. Die cut stars (or any other shape) and letters to spell anything you would like.
 I discovered a super easy way to attach glitter to the die cut letters without making a big mess. First, die cut your letters from cardstock. Then, run them upside down through a Xyron sticker maker. This will attach adhesive to the front of the letter.
 Then sprinkle them with glitter and shake off the excess. It's as easy as can be and virtually mess free! (I loved the Martha Stewart glitter for this project).
 Attach the banner together with wire or ribbon. You can leave a little space in between each pennant for tying bits of lace and ribbon if desired. Attach part of a Christmas pick to each end and finish off with some more pretty ribbons.
(I apologize for the quality of these photos. They were taken in the basement of the store and the lighting there was horrible)!
My last project for today is a simple layout I made using some scraps of paper:
 Bo Bunny's "Buttons and Bling" were perfect for creating this little tree embellishment. There were still plenty of buttons left over that I plan to use on some Christmas cards later.
 Happy Scrapping!
Jamestown
I know I've been horrible about blogging regularly, but I have a good excuse. It all boils down to the chaos of being a mother to my 2 boys. :)
One of the many projects we've been working on at our house is a model of Jamestown for my 13 year old's History class. He had less than a week to complete it from start to finish. It's made mostly from popsicle sticks, cardboard, and poster board. Throw in a little paint and sand, and you've got a 3 foot model of the first permanent English settlement in the United States.
 The fort was shaped like a triangle which might be great for defending itself against attacks, but not so great when trying to build it out of popsicle sticks. We finally got it to work out and Taylor was happy with the results.
 Here's his Jamestown sign and the front gate.
 A close up of one of the cannons with a cannon ball shooting out of it. (He loved that part the best).
One of the many projects we've been working on at our house is a model of Jamestown for my 13 year old's History class. He had less than a week to complete it from start to finish. It's made mostly from popsicle sticks, cardboard, and poster board. Throw in a little paint and sand, and you've got a 3 foot model of the first permanent English settlement in the United States.
 The fort was shaped like a triangle which might be great for defending itself against attacks, but not so great when trying to build it out of popsicle sticks. We finally got it to work out and Taylor was happy with the results.
 Here's his Jamestown sign and the front gate.
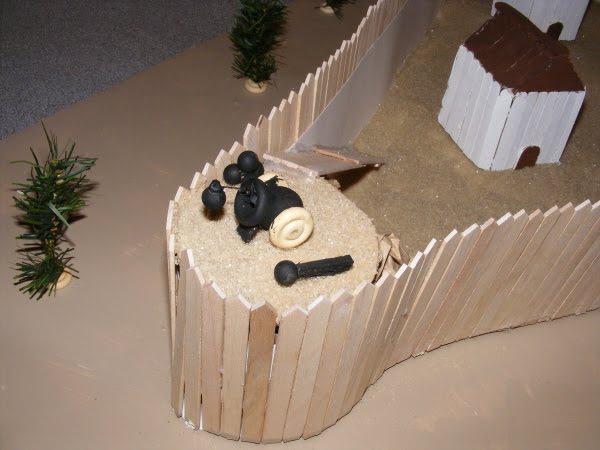 A close up of one of the cannons with a cannon ball shooting out of it. (He loved that part the best).
We took the project to school last week for grading. It wasn't easy to maneuver because it was so big. (Taylor didn't mention it could be smaller than 3 feet. His was the biggest one there!) We had to turn it sideways just to get it through the door.
I thought for sure they would keep all the models on display for a few days at the school since all the kids worked so hard on them. But no...we got to bring it right back home the same day. Now it is sitting in the middle of my living room floor. What do you do with a giant model of Jamestown? After all the hours of labor he put into it, you can't just throw it out right away. Besides, I will most likely end up helping with another one in a few years when Cam is old enough...I wonder if we can just use the same one?!
So I promise there will be some Christmas project ideas posted tomorrow. I worked on some this weekend for Porter's and they turned out really cute. So stay tuned!
Monday, November 9, 2009
Using Scraps
We have a neighbor lady who has been very sick for a long time. We decided to cheer her up with a big, bright, happy card from all the Primary children in our ward. I was trying to get this made at the last minute and only had scraps to work with. But I love how this turned out! It's amazing how a little of this and a little of that can turn into something that makes me happy to look at! :)
 Papers: Bo Bunny, Cosmo Cricket; Dies: QuicKutz
This is the outside of the card. It's 12x12, just like a regular sized layout, because we needed lots of room for all the kids to sign their names inside.
 This is a shot of the inside of the card before they wrote in it. It looked so cute when it was finished with all their little kid handwriting! We delivered it to our neighbor on Sunday since it was her birthday. She loved it!
Sunday, November 8, 2009
28 Photos!
I've been working on this fun Christmas layout and trying to find a way to put lots of pictures on one page. (I can't be the only one out there who takes a bazillion photos during the holidays, right)? If I counted right, there's 28 pictures on this layout altogether! How do you ask? Well read on...

I started out with little 2x3 photos (Read my last post to find out an economical way to print this many pictures). I created a grid that spanned a two-page layout and filled in the space with 2x3 bits of patterned papers as well as my photos. Then I created a large flap that lifts up to reveal even more!

I was able to showcase everyone in the family this way. It was a lot of work, but I love how it turned out! I used the new Christmas collection by My Mind's Eye and the matching die cut page turned out to be really handy. It included the journaling blocks, title, and little punch-out embellishments that I could fill in empty spaces with. I also used stamps, QuicKutz dies and other flat embellishments. Ultimately, I ended up with lots of journaling space, lots of photo space, and lots of places to embellish. What more could a scrapper ask for? :)
This type of layout would work great for any event where you take lots of pictures or want to summarize a period of time. Think "Year in Review," school, or holiday themes.
Subscribe to:
Posts (Atom)