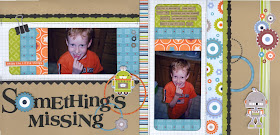
I had to dig back through some of my older photos to find these of Cameron's 1st lost tooth.
I decided that I'm really behind with organizing my pictures from my film camera days. I used to be really good about it. In fact, I was doing great until 2007. I don't know what happened, but I think I need to take a weekend and write on the backs and file them before I forget (even more) of what they are all about.
This layout is for a class I'm teaching at Porter's in March. It's pretty simple and uses the super cute Lil' Robots line from My Mind's Eye. I used lots of QuicKutz dies and border punches on this one. It came together pretty quickly and would be a great way to use up scraps of paper left over from other projects.
I love the little Robot guys...
There are die cut ones on cardstock weight paper:
and some chipboard pieces that are similar:
I blacked out a tooth on this little guy so his smile would match Cam's.
Friday, February 26, 2010
Friday, February 19, 2010
More October Afternoon
I finally finished this layout I had started a few weeks ago. Yay for me!!
I love this Report Card collection from October Afternoon. I could use it again and again!
This layout idea is a great way to use up scraps left over from other projects:
I love this Report Card collection from October Afternoon. I could use it again and again!
This layout idea is a great way to use up scraps left over from other projects:
Thursday, February 18, 2010
Life Stories
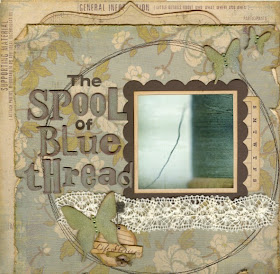
It's official! I am totally in love with this collection! Life Stories by My Mind's Eye is all printed on kraft cardstock making for muted tones and an all around vintage look. There is a blue collection and a pink/red collection. I can't tell which is my favorite...I love them both!
Here's a story I've been wanting to document for a long time. When I was small I accidentally "stole" a spool of blue thread from a fabric store. After playing in a large bin filled with colorful spools, I didn't realize I still had it in my hand when we left. This is the story of the life lesson I learned from that experience.
Photo courtesy of lepiaf.geo on Flickr.
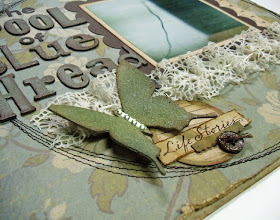
I got pretty messy with all of these layouts. For the title, I painted Tim Holtz grungeboard letters with crackle paint and then inked over them with dark brown.
I sponged blue and green distress inks onto the grungeboard butterflies, then finished them off with a spritz of Pearl Glimmer Mist.
I love making hidden journaling on a layout, especially if I have a lot to say. ;)
I saw the basic design for this next layout somewhere and now I can't figure out where it came from. (I think it was somewhere in the 2 Peas gallery). If anyone knows, please tell me so I can give them credit.
For my tree, I punched various sizes of circles from plain white tissue paper and sprayed them with Olive Vine Glimmer Mist. When I dried them with my heat gun, they kind of crinkled up, especially around the edges. Some of the circles were hit directly with the Glimmer Mist and show a gold shimmer. The colors soaked through to others when they were layered together which gave them a little different look. I think they turned out great! I attached each "leaf" with a tiny dab of Diamond Glaze.
The tree trunk was cut from a recycled piece of cardboard. I sprayed everything with an acid-neutralizer when I was all done.
This next project is a class I designed for Porter's.
These are a few of my girls who attend our scrapbook classes regularly. Some have been coming for as long as I've been teaching there (7-8 years?? I've lost count!). The idea for this layout was inspired by this video that I thought was way cool.
I've decided that Tim Holtz products work fabulously with this collection! The flowers were die cut from grunge paper. Then I colored them with a variety of alcohol inks, curled the edges, and added tiny beads to the centers. Check out Tim's beautiful grunge paper flowers here.
I tried cutting out paper dolls the old-fashioned way, but it was way too hard because they were so small. Then I discovered these cute little stamps by Autumn Leaves. Each girl is stamped individually onto patterned paper with...you guessed it...Tim Holtz Distress Inks. Then I cut around the entire row by hand.
Thanks for looking! I have another project I will post tomorrow.
Monday, February 8, 2010
Change in Schedule
Have you ever made plans and they didn't work out? So you made plans again...and they didn't work out? And...well you get the idea.
So I've been working with the new "Life Stories" collections from My Mind's Eye for over a month, and so far I've managed to complete just one layout. There are 3 others in progress, but other things seem to get in the way. In fact, it was my turn to do demos at Porter's Saturday and I was working with these very products. Guess how many layouts I got done in 3 hours? ZERO! It was very busy in the store (which is good) and I spent lots of time helping people at our die cutting center (everyone seemed to be cutting lots and lots of hearts that day) and showing products to customers. It was fine, since my job is to help customers and sell products, but it really interfered with my plan to scrap. ;)
I was going to finish all my projects and show them to you all at once, but since that's not happening, here's the one I did manage to complete (and it's a partial scraplift anyway). Hopefully someday, I will finish the rest! :)
So without further ado, introducing Life Stories by My Mind's Eye:
Papers and Die Cuts: My Mind's Eye; Alphabet Dies: QuicKutz; Stamps: Great Impressions; Embossing Powder: American Crafts
I am constantly amazed at how quickly my kids are growing up. So I decided to document Taylor's journey from a boy to a young man. Notice the picture of the hands? His is bigger than mine now. It's kind of sad!I was browsing through the gallery at MME and loved how Amber Packer cut apart the "Trip Information" paper and used just the compass from it. I also used the journaling lines to write a letter to Taylor and enclosed it in the large envelope.
The brown lace is actually made with a stamp and then heat embossed with American Crafts Zing powder. It's the perfect way to use as much ribbon as you want without breaking the bank!