Tuesday, June 29, 2010

#1 Dad

In honor of Father's Day this month, I made a layout featuring the 3 men (big and little) in my life. I used the "On the Boardwalk" collection by Graphic 45. It's a super fun line and I love, love, love the color combo! Even though it has a beach theme, I managed to use it on this masculine page just fine. :)

Papers: Graphic 45, My Mind's Eye; Journaling Card: My Mind's Eye; Die Cuts and Cork: QuicKutz; Filmstrip Ribbon and Memo Pin: Tim Holtz; Heart, Photo Corner, and Scalloped Circle Punches: EK Success.


Tim Holtz products always go perfectly well with Graphic 45, so of course I had to throw some in...

These little memo pins are one of my new favorites and the filmstrip ribbon adds a fun bit of flair.

I asked the kids to do the journaling and write what they love about their Dad. I think it's so fun to include them in documenting our family memories. How priceless is that handwriting...misspelled words and all!


It's easy to find pennants/banners anywhere you look in the crafting world right now, so I thought it would be fun to include a miniature version here. A diamond punch comes in really handy for that.

We all know how entertaining it is to play with bubble wrap. But did you know you can stamp with it as well? That's exactly what I did to create the subtle background pattern shown here. Give it a try! You'll love it!

Tuesday, June 15, 2010

Fun Website!

I ran across this super inspirational crafty blog today. This gal isn't afraid to try anything! Check it out!

Show & Tell

On a side note, I feel like I'm still trying to catch up after the scrapbooking conference I attended a couple of weeks ago. I have some kits and fun things to post, so stay tuned. Maybe tomorrow I won't need a nap. ;)

Tuesday, June 1, 2010

2 More Fabric Flower Tutorials

It's funny how these fabric flowers keep popping up in my life. :) These are too cute not to share! So as promised, here is another tutorial.


Start with a 3 1/2" fabric circle and a tiny rubberband (made for little girls' ponytails):


Find the center of the circle and gather it up. Then place the rubberband about half way up:


Snip the end off:

Lay the flower out flat, creating a double layer:


Attach a medium sized brad through the hole in the center. Rough up the edges of the fabric with your fingers. I ironed my flower so it would lay flat. Super cute!


Here's an easy variation...Cut a 2 1/2" fabric circle. You will also need a brad (I used a larger one) and a tiny rubberband:


Place the brad in the center of the fabric circle:


Fold the fabric around the brad and wind the rubberband around it from the outside:

Flatten out the circle, rough up the edges, and iron . These are fun to leave as is or to add some color with Glimmer Mist:

Enjoy!

Monday, May 31, 2010

My Classes for the Weekend Scrappy Conference

Here's a peek at the two classes I'm teaching this weekend at Cindy's Scrapbooking Conference in Pocatello. If anyone out there wants to attend, please join us! It's so much fun (not that I ever seem to get much scrapping done). :)

This year I'm doing a "boy" class and a "girl" class.

The first one is "On the Go." I used Fancy Pants papers and some punches and die cuts.

To make the tire marks, I ran my son's Lego car through a black ink pad, then ran it across my page. Easy! (Although Taylor wasn't sure what to think of my technique).


I love all the cute Fancy Pants elements that match the paper...


Here's the girly layout. These are 3 of my nieces:


Remember the rolled flower technique I linked to here? I used a QuicKutz scalloped border die and cut it in half lengthwise. Then I rolled the paper tightly before letting it come undone a little. I finished it off by gluing the end. It's a really easy technique and oh so cute! (I think it looks super cute with double-sided paper because you get a glimpse of both patterns).

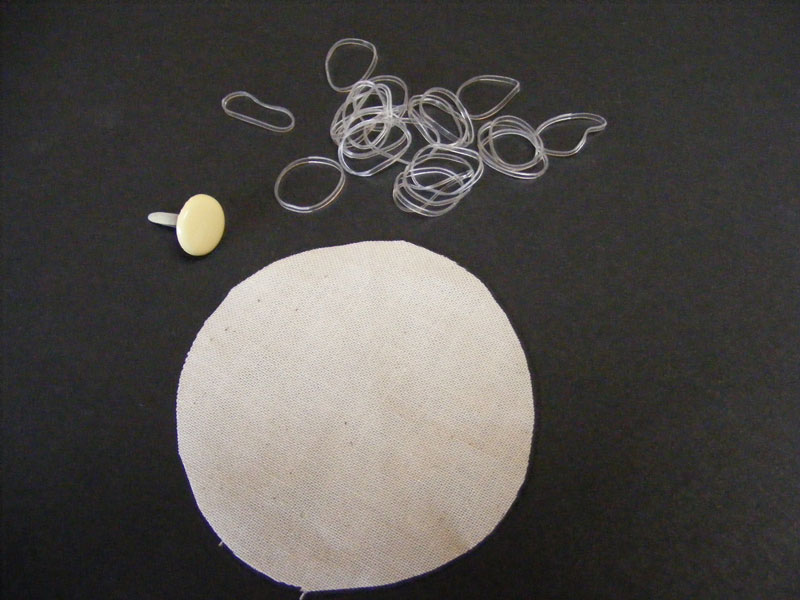
Then in my class at Porter's last week, one of my customers showed me how to make this darling muslin flower. I'll post a tutorial tomorrow, so stay tuned!

Well, back to the kit making! See you tomorrow!

Saturday, May 29, 2010

Things We Say Everyday

This layout was so fun to make! I involved the kids in trying to figure out what phrases we all say on a regular basis. I kept notes in a small tablet, and throughout the week we would add something else we thought of. It was so fun! We would be in the middle of a conversation, and suddenly one of the boys would point and say, "You say that all the time!" LOL! Good times!

I used the new So Sophie line from My Mind's Eye. Love, love, love this collection!!!

I used lots of die cuts and punches. I die cut one of the conversation bubbles from felt to add texture.
And I even dusted off my Silhouette to cut the "Days of the Week" border and the "Everyday" title. I forgot how much fun that machine is to use! (Note to self: Must use it more often). There are so many (as in hundreds and hundreds) of designs you can download from the Silhouette website to cut out. They can be re-sized to custom fit your project and are very affordable.


For a finishing touch, I made big 12" long stitches along the edges of the layout. I think the red color really pops against the black background.

So how about it? Why not document habits or sayings or anything else that's part of your "everyday." I think those are some of the funniest things to look back on and remember...

Wednesday, May 26, 2010

Miniature Banner

I'm really in love with all things Maya Road right now. Here's another darling project by Melissa Phillips that I swiped off the MR blog today. Check it out here.


I'm feverishly working on more projects at home, both for Porter's and for Cindy's scrapbooking conference coming up on June 4th and 5th. I'm so excited for the conference, but there's always lots of work to do to get ready. I am teaching some classes there and will also have some kits for sale. I will post those over the next few days. So until then, happy scrapping!

Saturday, May 22, 2010

Super Cute Storage Idea

Check out this darling idea for storing trinket pins designed by Jennifer Beason. For more pics and full instructions on how to make it, head on over the the Maya Road blog. There's lots more scrappy goodness, so be sure to browse while you're there. :)

p.s. I love how Jennifer made the rolled scalloped flowers. How cute would those be on a layout or card?