Showing posts with label Tutorials. Show all posts

Thursday, April 19, 2012

My 2nd Class for Cindy's SB Conference

I finished designing the layout for my 2nd class for Cindy's Scrapbooking Conference coming up on May 18-19.  I used papers from Crate Paper's "Farmhouse" Collection and a little bit from Simple Stories' "Year-o-graphy" line.


I'm teaching the people in my class how to make "Lolli" or Accordion Folded Flowers using a Martha Stewart Scoring Board.  I also made a tutorial here.  I have decided that using hot glue to secure them is a lot easier than waiting for liquid glue to dry.

Wednesday, May 4, 2011

3-D Layered Flowers

October Afternoon has posted a wonderful tutorial for making this gorgeous 3-D flower.  Check it out here.  So pretty!

Monday, April 4, 2011

Accordion Folded or "Lolli" Flowers Tutorial


I've been on a "Lolli" flower making kick lately and thought I would share with you how to make them.  They can be made easily from any size strip of paper.  It's a great way to use up some of those scraps! 

Start by cutting a 1" x 12" strip of paper.  (You can make them wider or thinner than 1".  The diameter of the flower will end up being a little more than double the width of your paper strip). 

 Next I scored the strip every 1/4" using my new Martha Stewart Scoring Board. 
(I have to say that having a scoring board makes this process SO much easier!).  Scor-Pal also makes a scoring board. However, I decided to purchase the Martha Stewart one for a couple of different reasons.  First, it has scoring lines every 1/8" while the Scor-Pal seems to have more random measurements.  Second, the MS board was much less expensive, especially after using a 40% off coupon at Michaels.  Third, the MS board has a handy little add-on tool to help you easily make envelopes.  There are many You Tube videos comparing the two if you would like to take a closer look. 


After the entire strip is scored, fold back and forth like a fan.  
NOTE:  I wanted the green side of the paper to show after the flower was complete, so I made sure the first fold was pointed down.  This way, when you get to the end of the flower, it finishes off nicely.


This is what is should look like when it's all folded up.

Next, use a strong glue along one edge as shown.  
(Use something like Diamond Glaze, Red-Line Tape, etc.  Glue dots don't work so well.  They can't hold up to the tension the flower causes once formed into a circle).

Glue the two ends together and hold for a minute or two until dry.  
(You could also hold it closed with a clothes pin or office clip).

 Punch a 1 1/4" or 1 1/2" circle from any color paper.  
This won't show as it will be attached to the back of the flower.
Add strong glue to the circle, but not enough that it will squish out of the sides when pressed down.

This is the part where you sometimes need more than 2 hands.  :)
Flatten the flower, top side down.  (The orange that you see is the back of the flower). 

While holding the flower in place, attach the circle glue side down, to center of flower. 
Press down for a couple of minute while it dries, or place a heavy object, like a book, on it.

The back should look something like this when done.

Flip it over and embellish with coordinating paper, buttons, brads, ribbon, string, rhinestones, etc.


Another fun way to jazz them up is by using a border punch along the edge first.  Then instead of scoring every 1/4", score in between each scallop.

Here's an example of a completed flower with the scalloped edge.

Here's a peek at some completed layouts I recently used Lolli flowers on:

"Eggcellent"


This small pink flower started out as a 1/2" x 12" strip.


"4 is my Lucky Number"


Thanks for looking!  If you have any questions about making these flowers, there are tons of tutorials on You Tube that show you a few different methods.  Give them a try!

Saturday, February 12, 2011

Rolled Felt Flower Tutorial--Super Easy!

To continue on with my flower craze, here is a super easy way to create a felt flower for cards, layouts, headbands or other fashion accessories. 


1.  Start by cutting a circle from felt.  Mine is almost 4" in diameter.


2.  Then cut into a spiral.  This doesn't have to be perfect.  The wider your cuts are, the taller the flower will be.

3.  Roll from the outer edge to the inner.
4.  Hot glue the end underneath the flower. 
Easy Peasy!


I used 3 rolled felt flowers on this layout.  I accented them with some crumpled paper leaves and Maya Road stick pins.

Supplies:  Bazzill Cardstock; Patterned Paper:  My Mind's Eye; Chipboard Bird:  Scenic Route; Dies:  QuicKutz; Stick Pins:  Maya Road; Stitching Stamp:  See D's; Ink:  ColorBox; Other:  Baker's Twine, Buttons, Lace, Floss.

Wednesday, November 10, 2010

Folded Paper Flower Tutorial

Interested in learning how to make this beautiful folded flower?  Click here.

Wednesday, November 3, 2010

ReThink Your Stamps

Studio Calico has a fabulous tutorial full of unique ways to use your stamps.  Check it out here.

Tuesday, November 2, 2010

Pleated Paper Star Tutorial

Here it is...my version of the pleated paper star!


STEP 1:
Cut a 1 1/2" x 12" strip of patterned paper.  Score vertically every 1/4".  (Notice that's a scoring blade, not a cutting blade).  You will have five 12" long scoring marks when you are done.


STEP 2:
Cut the strip into 1 1/2" x 2" pieces.  This will give you 6 pieces.  You only need 5.  Using a fine-tipped red pen and a ruler, draw three lines across the top of each small piece.


STEP 3:
Fold each piece like you would a fan.  When the green side is up, the two folds on the ends should be pointing down.  This gives you 3 peaks and 2 valleys.

STEP 4:
Using a tiny stapler (like a Tim Holtz Tiny Attacher), staple the end closest to the red lines. Repeat for all five pieces.


STEP 5:
Arrange pieces into the shape of a star and attach to background with glue dots.


STEP 6:
Cover the hole in the center of the star with punched pieces placed on pop dots.  Embellish as desired.


Enjoy!


Tuesday, October 26, 2010

So Loved

A few weeks ago, my brother and his family welcomed a new baby girl into their home.  As Baby #6, she had 3 older sisters and 2 older brothers who were anxiously awaiting her arrival.

A few days after her birth, her dad emailed me some photos.  As I was scrolling through them, I was delighted in each pose that was the same, except for a different face smiling above hers as they each cradled Baby Lucy in his or her arms.  It struck me how lucky she is to be loved by so many people right from the start!

The pictures prompted this "So Loved" layout which I pieced together in a patchwork quilt style.  The muted tones and rich colors feel warm and welcoming.  I kept the embellishments to a minimum so the focus would remain on the photos.

p.s.  The layout really isn't crooked...I just can't take a straight picture.
I've been looking for an excuse to use these beautiful paper roses on a project.  I cut out the scalloped peach flower (shown below) using my Silhouette.  But you can also create one easily on your own like I did for the ivory flower.  Here's a quick tutorial for a spiral cut flower on the Fancy Pants blog.  (Scroll down until you seen "Spirals").


I love the dimension they add to this layout!


Here's my new "Plants" die from QuicKutz.  It's simple and elegant...love it!


Yes, Lucy is definitely loved.  Don't you agree?

Supplies Used:  Cardstock:  DCWV; Patterned Papers:  My Minds Eye; Dies:  QuicKutz; Border Punch:  Fiskars; Journaling Stamp:  WRMK; Pin:  Making Memories; Butterfly Punches:  Fiskars and Marvy; Flower:  Prima; Pearls:  K&Co.

Saturday, September 25, 2010

Beautiful Distressed Paper Flowers

Bo Bunny posted a tutorial today on making these gorgeous "Water Distressed Blooms."  Be sure to check it out here!

Sunday, September 5, 2010

Crepe Paper Flower Tutorial

As promised, here is the tutorial for making the crepe paper flowers I used on the layout I posted about yesterday.


I purchased a package of crepe paper that came in a big sheet (8 ft x 20 in).  I found it in the same section of the store where the tissue paper and gift bags were.

Start with a strip that measures 4" x 20": 

Fold it in half:

Then fold again into thirds:

 This is what it looks like folded into thirds and lying flat:

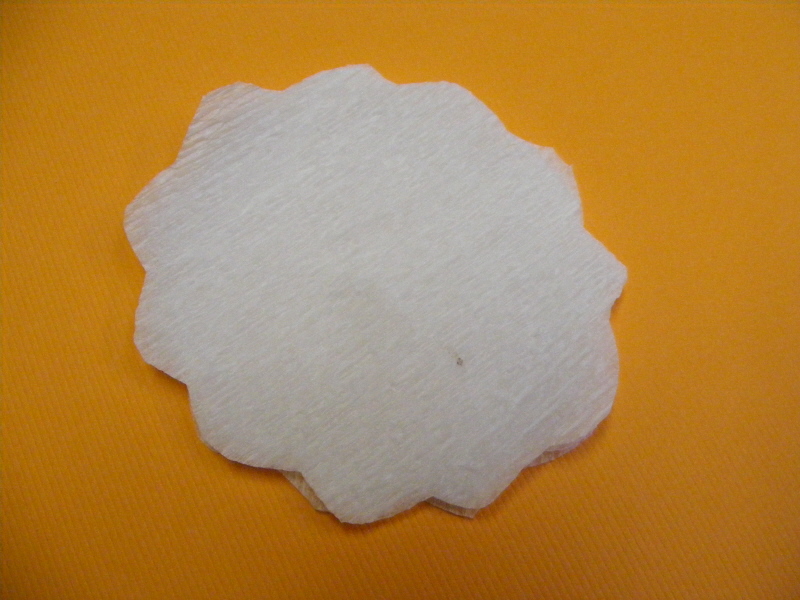
Cut all the layers into a circle.  I didn't measure (can you tell?) but it's OK...they don't need to be perfect:

When you are done, you will have 6 circles.  (Keep them together in a stack, though).

You can leave them in a circle, or cut a scalloped edge.  Again, I just free-handed the scallops:
Punch a 1" circle from cardstock.  Add a dab of hot glue or a strong liquid glue (like Diamond Glaze).  If you use hot glue, work quickly:
Gather the flower up:


Snip off the bottom:


Press the cut end of the flower into the glue.  Let dry:

Spread the layers out and fluff them:

If you want to add a touch of color, sponge a little bit of pigment ink onto the edges of the flower:

Done!

Here's a tip:  Don't use a spray mist to color your crepe paper flower.  The water content will take the crinkles out of the crepe paper and make a big mess!  It might work on tissue paper, though, but I haven't tried it.

Speaking of tissue paper, here are some similar flowers my Mom helped the kids make this summer.  She cut circles from colored tissue paper.  Instead of gluing them to a base, she poked a hole in the center and threaded a pipe cleaner through.  She folded the tip of the pipe cleaner over to keep all the layers into place and covered that up by fluffing the tissue paper in the center.
 
Don't they look pretty?  I love the different colored layers the boys created.  See what you could do on a layout or card?