Saturday, October 24, 2009

Photo Cropping Made Easy

I love creating "Gratitude" layouts. Even though the things I'm grateful for stay pretty constant from year to year, I think it's fun coming up with new ways to express them.

This layout was inspired by the phrase "Counting my Blessings." I thought it would be fun to substitute falling leaves with numbers to symbolize the abundance of blessings we receive each year. I also wanted a way to include lots of pictures on the page but keep the layout linear. My solution came in the form of 2" x 6" photos. This way I was able to add 7 photos without overwhelming the overall feel of the layout. I left one photo in color, because I wanted to showcase the beautiful autumn colors as well as the temple, and changed all the rest to black and white.

Papers: Pebbles; Dies: QuicKutz; Stamps: American Crafts, Hampton Art; Border Punch: Fiskars; Cork: QuicKutz; Other: felt, buttons, pins, ribbon.

PHOTO TECHNIQUE:
While reading through the September 2009 issue of Creating Keepsakes, I ran across an article by Jessica Sprague about a cool technique for getting multiple photos on one 4x6 print. She taught how to create six 2x2 photos on one print and I used the same technique to get two 2x6 photos on one print. I have looked all over the internet for a link to this and haven't been able to find one. So I will share with you how it's done. Please keep in mind that I am NOT a Photoshop expert at all, but this is what worked for me. (This tutorial came straight from the Creating Keepsakes magazine...I have just changed the dimensions to create the photos for this particular layout).

1. Open two photos. Go to File>New>Blank File to create a new document. Set it to 4" wide, 6" tall and 300 pixels per inch. Click OK.
2. Double-click on your first photo in the Project Bin to switch to it. Select the Crop Tool. In the Options bar at the top of your screen, type 2" for the width, 6" for the height and 300 pixels/inch for the resolution. Click and drag over your photo to select a crop area. Double-click inside the selection to commit.
3. Select the Move Tool. Click and drag the cropped photo down onto the thumbnail of your new document in the Project Bin at the bottom of your screen. When Photoshop Elements switches over to your blank document, click and drag your photo to position it as desired. Repeat steps 2 and 3 for each photo.


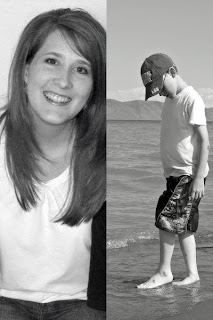
This is what your 4x6 print will look like when you are done. Simply cut them apart to attach the photos to your layout.

I love using this technique for printing wallet-sized photos as well. It's a real money saver and takes the guess work out of cropping manually. Give it a try!

Wednesday, October 21, 2009

Celebrate Fall!

Autumn is one of my favorite times of the year. I love putting on sweaters, drinking hot chocolate or hot apple cider, and snuggling up in my Minkee blanket with a good book. I am inspired by the vivid array of fall colors that surround the beautiful area we live in. It really puts me in the mood to scrapbook!

Orange has never been a favorite color of mine, but I have to say that when it comes to fall, I make an exception. We always have to take the traditional photos of carving pumpkins and the kids playing in the leaves, and orange seems to be the perfect accent!


I created this layout using the new "Boo to You" collection by My Mind's Eye. I loved that these papers were not just about Halloween. The owls were the inspiration behind this layout. I thought they were too cute to resist and matched perfectly with the QuicKutz owl die I had sitting around.

The idea for this layout came from a sketch I found online. I changed it up a little and spread my photos across the bottom of the layout. There's room for up to 10 photos and lots of journaling.

Here's a few more Fall layout ideas I have created over the past year...Enjoy!


Tuesday, October 20, 2009

We R Memory Keepers

Last weekend I got to play a little bit with some new papers from We R Memory Keepers. I only wish I had time to create some more! I have a half-finished layout on my desk that I wanted to post along with these. But maybe it can be a bonus idea in a few days.

First off is the Geo-Hectic collection. It's great for all things boy! I love the die cut edges and lined papers, but I especially love these giant metal brads! I used some of them to create my title in this simple layout:

Also included in this collection is some cute foil tape in the shape of gears, 3-D stickers, glitter brads, acrylic $1 stamps, and matching textured cardstock. Cute, cute, cute!

Next is the "Twirl" collection. Who wouldn't love this? The colors are bright and vivid and although a bit girly, I was still able to use them on this page about me and my boys.

I used the 3-D stickers for my title and some of the embossed cardstock stickers to embellish throughout. The little bird, song notes, and journaling block were all created with the cute $1 stamps.To see more of this collection up close, click here and scroll down a little bit.

Thursday, October 15, 2009

Great "How-to" Blog

This is just a quick post to point you in the direction of a great crafty blog I found today. The Pursuit of Craftyness has contributions from some well known designers in the industry. I LOVE the tutorial index you will find down the right side of their blog where you can link to some great step-by-step instructions for anything ranging from how to color felt to making cards from recycled materials.


I really love this post about how to make your own journaling labels. I might have to try that with my QuicKutz dies.

There's some great inspiration there, so take a peek when you have some time! You can also become a fan on Facebook. They have a link on their blog for that as well.

Enjoy!

Monday, October 12, 2009

Halloween Treat Bucket

I made this Halloween Treat Bucket awhile ago and thought it would be fun to share it now.


I started with a 1 gallon clear paint can and some double-sided paper. I trimmed a sheet of paper to the same height as the can and carefully slipped it inside. By placing it inside the can instead of attaching it to the outside, it solves two problems:

1. You don't have to figure out how to cut your paper around the round metal deals that hold the handle into place.
2. You don't have to worry about any adhesive showing through the can...either on the inside or the outside. See? Easy, peasy!

Next, I created a label on my computer that says, "Place treats here. (No tricks allowed)." I framed this with some chipboard that I cut by hand and attached it around the can with some thin ribbon.

Finally, I added some matching chipboard embellishments to the title and also hung some from the handle with twine. I placed some arrow rub-ons on the outside of the can, pointing the way to the opening where anyone can drop in some candy (just in case they needed help finding their way there)!

I like how the can looks dimensional with elements on the inside and the outside. It was fun to make and Cam used it for trick-or-treating last year. It was a real hit!

Thursday, October 1, 2009

Fancy Pants Halloween Collection

I'm in denial that it could possibly be Autumn already. Where did the summer go?

One thing I like about the changing seasons is the new collections that start rolling into the store. Among the many Halloween lines out there, Fancy Pants "Trick or Treat" is one of my favorites!


For one of my classes at Porter's, I wanted to show people that you don't necessarily have to use these papers for a Halloween layout. So instead, I created a boy page that's all about the weird things they do!


I used the Tim Holtz chains to "hang" some of the photos from and to give the yellow monster something to dangle off of. I love all the different sizes of googly eyes too! It was a fun layout to make and has space for lots of photos or some more over sized monsters.

My boys aren't excessively noisy or dirty, although if you saw their room today, you would wonder. However, there have been days I've come home to things splattered on the ceiling (imagine Olive Green Glimmer Mist on my vaulted living room ceiling..."I don't know how that got there, Mom!") or bicycle tires floating in the bathtub (that's a story for another day). They do have some funny quirks, as I'm sure most kids do, and they seem to be oblivious to dirt. But I can't imagine my life without them...dirt, slime, noise and all!