Showing posts with label Altered Items. Show all posts

Saturday, May 5, 2012

Art of Wild Abandonment Giant Bloghop


Hi!  If you're here for the "Art of Wild Abandonment" Bloghop, you have probably just arrived from Karen Maldonado's blog.  This is a HUGE hop and you are now more than half way through.  :)  Kudos to you if you have stuck with us this far. :) There is so much talent out there and I'm having a blast checking out all the inspiration...I hope you are too!  Don't forget to continue on by visiting Sheryl Callan Meilahn here.  And if you haven't started from the beginning, you can join in on all the excitement by clicking here to learn all about it.

When I first stumbled across Junelle Jacobsen's art, I immediately fell in love with her style!  So when Christy Tomlinson announced that she was partnering up with Junelle to teach an art journaling class, I was absolutely giddy!  It has been worth every penny!  I have soaked up the videos and although I haven't had as much time as I would like to create art, I've been squeezing some in here and there.

Here's a look at a little bit of what I've created so far.  Some of these pieces are from the art lessons we learned in class, so they may look similar to what you may have already seen throughout the hop.  

"Spring Lineup"
 This was my first entry in my new art journal.  I pretty much copied Junelle's idea and added my own meaningful words.


 I made my little nest from thin hemp string.

 White Sharpie paint pen...my new favorite for highlights!

Silly little bird!


"Spring Gifts"
This is watercolor on gesso.  I loved drawing the peas!  I never would have thought of something so simple and creative without Junelle's perspective.  So fun and playful!
 
 
"So Many Ideas"
Another one of Junelle's ideas I stole.  Hers was about laundry...mine is about all the creative ideas that are floating through my head.  It seems there's never enough time to get them all onto paper or canvas.  :)


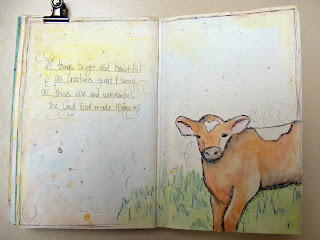
"Bright & Beautiful"

Our neighbors have a small farm.  This spring I have loved watching the baby animals romp and play together.  This little calf caught my attention because she has a nearly perfect heart on her forehead.  I attempted to capture her in watercolors.  I'm such an amateur!  :)

Well that's it for now!  I have a sheep canvas I have finished (so cute!!), but I will wait and post it tomorrow.  This class has been so much fun!  I hope you will consider taking it.  You can sign up at any time here.  Don't forget to check out the next blog in our giant bloghop!  Thanks for visiting!


Tuesday, May 1, 2012

Hold Hands Tightly and Hearts Gently

Here's a simple 8x8 canvas I made.  This was my first time using a burlap canvas.  I love the deep texture of the fabric, although it was a little bit different than painting on a traditional canvas.


The background was made with acrylic paint and then a little stamping to add texture. I bought a bubble wrap stamp to use with my altered art projects, but I like stamping with real bubble wrap better.  Too funny!

 I didn't use many rub-ons on this project...just doodling and some stamping.


 I used white Liquitex acrylic ink over book paper for the roof because I wanted it to be transparent so the words would show through.

 This is one of my favorite quotes!  I'm sure I'll use it on more projects.  :)


 To make the cloud, I used the negative portion of a die cut and swirled light modeling paste over it like a stencil.  I love how fluffy it looks!

Now it's off to live at a friend's house.  Hope she likes it!


Monday, April 30, 2012

Young Women Values Girl

In my church I am over a group of girls ages 12-18.  Our Young Women's program focuses on 8 values that we encourage the girls to develop in their lives.  

For an activity one night we made She Art Value Girls.  (I borrowed the idea from a canvas Christy Tomlinson designed).  The young women had so much fun getting messy with paint and mod podge!  To make things simpler (and less expensive) we didn't use rub-ons like I usually do on my canvases, but we had plenty of texture stamps there that they used instead, along with doodling.  

Here's the one I made that they used as an example.  It was so fun to see how each girl personalized hers with the paint colors she chose, the texture she used, and how she styled the hair.


 I prepped the backgrounds ahead of time by mod podging tissue to the canvas and then painting the blue and green.  Then the girls added their own texture with stamps and paint.  (At the thrift store I found a fabulous stack of old sewing patterns that I used for tissue.  They worked great)!

I created the blouse from muslin and mod podged it onto the canvas.


To save time, I made high quality color copies of the skirt and blouse from my canvas and printed it onto cardstock.  The girls added arms, legs, and a head from book paper to their own canvases, then glued the cardstock dress over the top.  That way they didn't have to deal with cutting and decorating the patterned paper layers.  This saved us so much time!  The girls did add their own lace and buttons as accents.  When they were done stamping and doodling, you couldn't tell it was a copy at all!


Love it!

Saturday, April 28, 2012

More She Art Canvases

I made some more 6x6 She Art canvases for gifts awhile ago and realized I never shared them here.  I tried to make each one as personalized as possible for the friend who was receiving it.  I love how they all ended up having their own personalities!

"CANDI"


I love the little boots!


"KATHY"


 I had some problems with Kathy's hair to start with.  It turned out WAY too big!  It was actually quite comical.  Thank goodness for paint.  I just covered it up and started over.  :)

"AMMIE"


Did you know you can sign up at any time for Christy Tomlinson's She Art Classes?  Check out all her workshops here.

Saturday, July 9, 2011

My First "He Art" Canvas

A few months ago, I won a spot in Christy Tomlinson's "She Art Workshop."  I was so excited to start but life kept getting in the way.  Most of May and all of June I was consumed with planning and carrying out a youth conference for teens in my area.  It was an amazing experience!  However, it left me with no time at all to be creative and I have missed it a lot.  So this week I decided I was just going to do it and I'm so glad I did!  


I ordered a few art supplies online that Christy suggested, but they hadn't come yet and I was too impatient to wait.  So I decided to gather up what supplies I had on hand at home and I was so surprised with what I was able to find.  Part of Christy's objective is finding miscellaneous items that can create texture and add dimension and interest to the canvas.  I was able to see things in a new light and that might have been the most fun part about this class for me!

I was totally going to start with a girl on my first canvas, but when I sat down to create, I decided, "Why not make one for each of my boys?"  So here is my very first attempt at canvas art:

 There's lot of symbolism in this canvas.  The background consists of copies of a story Cam wrote, his sheet music, Yu-gi-oh cards, Harry Potter memorabilia, and a heart he drew.  Most of it got covered up, but we know it's there.  :)  I painted over the heart again, which you can see along the right edge.

 One of the things I love about Christy is the way she creates art so freely without worrying about whether or not it's perfect.  She layers paint, ink, paste, rub-ons, stamps, and doodles and it all ends up looking fabulous!  I really tried to not think about what I was doing and just go for it.  It was actually very liberating!

 Lots of stamps and rub-ons here.


 I wanted to add something meaningful with the phrase.  This describes Cam to a T.  He's so friendly and gets along with everyone.

 Last week we lost our Sadie dog who had been part of our family for nearly 14 years.  She was crazy and spastic and often in trouble, but we will miss her dearly.  Cameron was especially broken hearted.


 I really wanted to add some freckles, but was a little scared to.  I still might do it...


Well, that about sums it up.  I'm going to make one for Taylor next and then we will see what else pops into my head.  I have lots of ideas!  :)  Thanks for looking!


Monday, April 11, 2011

Christy Tomlinson's She Art Workshop


Guess what?  I am soooo stoked!  I just won a spot in Christy Tomlinson's She Art Workshop!  I have been eyeballing this class for a few weeks and watching her free videos about altered canvases.  She amazes and inspires me!  I love how she creates with such freedom and abandon and doesn't worry about things being perfect.  For those of you who know me, I am a perfectionist and sometimes drive myself crazy that I can't just go with the flow.  I'm hoping this class can help me embrace a little of that freedom. 

Class started today, but it's not too late to sign up if you are interested.  It's all online, so it's easy to catch up.  If you aren't familiar with her work, take a few moments to check out her blog.  Christy owns Scarlet Lime and has started selling mixed media supplies in her online store.

I will definitely make time for this class and share my creations with you here (as long as I can get past the perfection part).  :)

Thursday, February 3, 2011

Cutest Valentine Mailbox Ever!

I remember as a child having mailbox decorating contests at school for Valentine's Day.  Everyone would vote for their favorite one and then we would all exchange valentines. 

Now that I'm older, I still have a tiny obsession with cute little mailboxes.  Take a look at this one from Mouse Paper Lovely.  It's ready for you in an easy-to-print format for only $2.49 here.  It is made to fit the darling little mailboxes from the Target dollar spot.


Don't you just love it?  Super cute!

Monday, August 16, 2010

Wall Art

I wanted to create a piece of meaningful art to hang in our family room. I have always loved this quote (which was taken from a Hallmark card) and decided to incorporate it into this project. The three canvases of varying sizes are displayed on a metal plate holder. I used pretty papers and chipboard from the Bo Bunny "Flower Child" collection.

Admire the moon.

Be silly.

Take risks.

Look on the bright side.

Listen to your heart.

Don’t fear love.

Remember, it’s never too late.

Share!

Don’t run...face your fears.

Be an optimist.

Open a new window.

Laugh often!

Live today!

Speak straight and true.

Reach out!

Take time.

Be brave.

Life’s too short to be ordinary.


I formatted the quote in Microsoft Word and printed it directly onto patterned paper. I layered chipboard embellishments and accented them with jewels and decorative brads:


More chipboard pieces are layered over "grass" hand cut from "Free Bird" paper and nestled inside a machine-stitched frame. I love the 3-D effect of the layered canvases.


I attached the photo and papers to the canvases with spray adhesive. This was much less messy than trying to use Mod Podge. I hot glued the small 4x4 canvas with our family photo to the larger 10x10 canvas. This made the the bottom canvas a little top heavy and it kept tilting forward off of the plate holder. I remedied that little problem by simply tying the canvas to the plate holder with a piece of ribbon on the back.

This project was fun to make and it was so easy to use the coordinating product from Bo Bunny. Hope you enjoy it!

Tuesday, June 1, 2010

2 More Fabric Flower Tutorials

It's funny how these fabric flowers keep popping up in my life. :) These are too cute not to share! So as promised, here is another tutorial.


Start with a 3 1/2" fabric circle and a tiny rubberband (made for little girls' ponytails):


Find the center of the circle and gather it up. Then place the rubberband about half way up:


Snip the end off:

Lay the flower out flat, creating a double layer:


Attach a medium sized brad through the hole in the center. Rough up the edges of the fabric with your fingers. I ironed my flower so it would lay flat. Super cute!


Here's an easy variation...Cut a 2 1/2" fabric circle. You will also need a brad (I used a larger one) and a tiny rubberband:


Place the brad in the center of the fabric circle:


Fold the fabric around the brad and wind the rubberband around it from the outside:

Flatten out the circle, rough up the edges, and iron . These are fun to leave as is or to add some color with Glimmer Mist:

Enjoy!