4 days ago
Showing posts with label Tips. Show all posts
Friday, July 9, 2010
Stamping with Acrylic Paint
I love stamping on layouts (although I haven't done it for awhile). There is a great little tutorial on the Scrapbook Trends blog on the perfect technique. Be sure to check it out here.
Tuesday, July 6, 2010
Photo Ideas-Road Trip
Going on a road trip this summer? Becky Higgins has some great suggestions for some fun photos you can take to document the experience. Check it out here.
Tuesday, June 1, 2010
2 More Fabric Flower Tutorials
It's funny how these fabric flowers keep popping up in my life. :) These are too cute not to share! So as promised, here is another tutorial.

Start with a 3 1/2" fabric circle and a tiny rubberband (made for little girls' ponytails):

Find the center of the circle and gather it up. Then place the rubberband about half way up:

Snip the end off:

Lay the flower out flat, creating a double layer:

Attach a medium sized brad through the hole in the center. Rough up the edges of the fabric with your fingers. I ironed my flower so it would lay flat. Super cute!

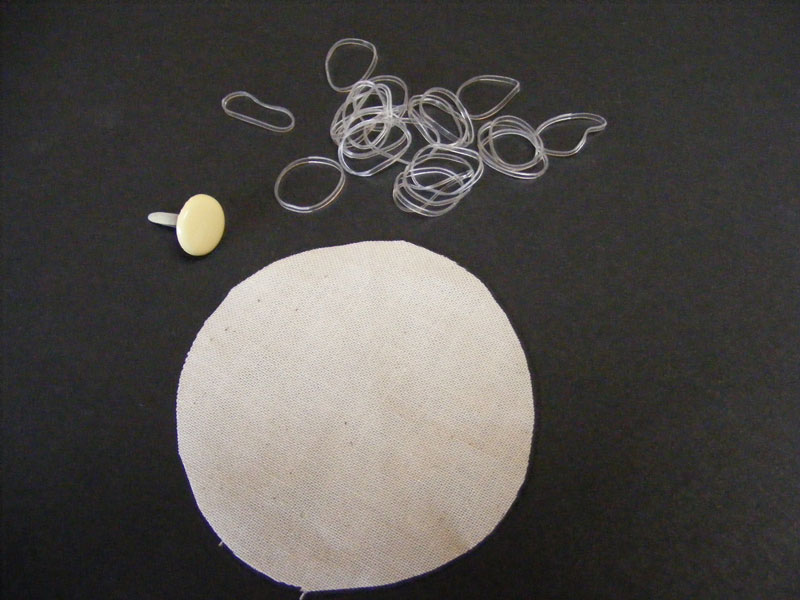
Here's an easy variation...Cut a 2 1/2" fabric circle. You will also need a brad (I used a larger one) and a tiny rubberband:

Place the brad in the center of the fabric circle:

Fold the fabric around the brad and wind the rubberband around it from the outside:
Flatten out the circle, rough up the edges, and iron . These are fun to leave as is or to add some color with Glimmer Mist:

Enjoy!

Start with a 3 1/2" fabric circle and a tiny rubberband (made for little girls' ponytails):

Find the center of the circle and gather it up. Then place the rubberband about half way up:

Snip the end off:

Lay the flower out flat, creating a double layer:

Attach a medium sized brad through the hole in the center. Rough up the edges of the fabric with your fingers. I ironed my flower so it would lay flat. Super cute!

Here's an easy variation...Cut a 2 1/2" fabric circle. You will also need a brad (I used a larger one) and a tiny rubberband:

Place the brad in the center of the fabric circle:

Fold the fabric around the brad and wind the rubberband around it from the outside:
Flatten out the circle, rough up the edges, and iron . These are fun to leave as is or to add some color with Glimmer Mist:
Enjoy!
Labels:
Altered Items,
Tips
Saturday, May 22, 2010
Super Cute Storage Idea
Check out this darling idea for storing trinket pins designed by Jennifer Beason. For more pics and full instructions on how to make it, head on over the the Maya Road blog. There's lots more scrappy goodness, so be sure to browse while you're there. :)
p.s. I love how Jennifer made the rolled scalloped flowers. How cute would those be on a layout or card?
Labels:
Altered Items,
Inspiration,
Tips
Friday, May 21, 2010
More Free Vintage Clip Art
Check out The Graphics Fairy for some cool FREE vintage clip art and wonderful project ideas. I'm in love!
Thursday, May 20, 2010
Tulle Flowers Tutorial
We just received some new 7 Gypsies papers in the store a couple of weeks ago and I could hardly wait to play! I love the shabby, vintage feel to them.


Here's a close up of the tulle flower I made in under 10 minutes:

I started with a roll of pink tulle which I found in the wedding section of Porter's. You can also find tulle by the yard in fabric stores. You will want to use clear or matching thread for your project.
1. Cut 5 ovals that are all the same size:

2. Fold the first oval in half lengthwise.
3. Thread a needle (double your thread) and tie a knot in the end. Make a stitch through the tulle, but don't pull it all the way since the knot would just pull through the holes in the tulle. Loop the needle through the opening in the thread near the knot and pull tight:

4. Make a basting stitch along the curved edge:
5. Then pull tight. This creates one petal:

6. Without knotting or clipping your thread, repeat steps 2, 4, and 5.

7. Continue adding petals until all 5 are gathered:

8. If desired, add some beads to your thread and sew them to the center of the flower:

9. Knot the end of your thread when finished:

These flowers make the cutest hair bows as well as accents for many crafting projects. You can make them as large or small as you like. Experiment and have fun!

Here's a close up of the tulle flower I made in under 10 minutes:

I started with a roll of pink tulle which I found in the wedding section of Porter's. You can also find tulle by the yard in fabric stores. You will want to use clear or matching thread for your project.
1. Cut 5 ovals that are all the same size:

2. Fold the first oval in half lengthwise.
3. Thread a needle (double your thread) and tie a knot in the end. Make a stitch through the tulle, but don't pull it all the way since the knot would just pull through the holes in the tulle. Loop the needle through the opening in the thread near the knot and pull tight:

4. Make a basting stitch along the curved edge:
5. Then pull tight. This creates one petal:
6. Without knotting or clipping your thread, repeat steps 2, 4, and 5.

7. Continue adding petals until all 5 are gathered:

8. If desired, add some beads to your thread and sew them to the center of the flower:

9. Knot the end of your thread when finished:

These flowers make the cutest hair bows as well as accents for many crafting projects. You can make them as large or small as you like. Experiment and have fun!
Labels:
scrapbooking,
Tips
Wednesday, May 19, 2010
Fabric Flowers Tutorial
Fabric flowers are all the rage right now. You can see them practically everywhere you look whether they are adorning someone's hair, tote bag, or crafting project. So why not add some to a layout or card?
I made one from muslin and colored it with Glimmer Mist for this layout. To find out how to create one of your own, read on...


Click on any of the pictures for a larger view.
I started with a piece of torn muslin approximately 1" wide and 1 yard long:

Fold the muslin in half so both torn edges are together. (You don't have to fold the whole length in half at once...just fold as you go):

Start rolling from one end and roll 4 or 5 times. This will be the center of the flower. Since I'm right-handed, I started rolling from the right end with the raw torn edges at the top :

Holding the roll firmly, flip it to your other hand with the raw edges still at the top:

Create a half twist in the fabric and then wrap it around the small roll you created: Continue twisting and wrapping as you work your way around the flower center:

Here's what mine looks like from the top after a few times of twisting and wrapping:

Continue twisting and wrapping until your flower is the size you want it:

When you reach the end of the fabric, your flower should look something like this:

Temporarily pin fabric into place with a corsage pin or long needle:

With the large pin still in place, take a needle and thread and stitch back and forth across the back of the flower. Be sure to catch all the loose layers so they stay in place. (I've used dark thread so you can see what I've done. You will want to use white or ivory thread so it doesn't show):

Here's a look at the very ugly back of my flower, but hey...it's all secure! (p.s. make sure you leave yourself enough thread to tie a knot). ;)

Spritz the top of the flower with Glimmer Mist. Don't overdo it...just 2 or 3 sprays is all you need:

Ta da!! I added a couple of beads to a corsage pin and used it to adorn my flower:

Check back tomorrow for a tutorial on tulle flowers. These are perfect for hair bows as well as scrappy projects!
I made one from muslin and colored it with Glimmer Mist for this layout. To find out how to create one of your own, read on...

Click on any of the pictures for a larger view.
I started with a piece of torn muslin approximately 1" wide and 1 yard long:

Fold the muslin in half so both torn edges are together. (You don't have to fold the whole length in half at once...just fold as you go):

Start rolling from one end and roll 4 or 5 times. This will be the center of the flower. Since I'm right-handed, I started rolling from the right end with the raw torn edges at the top :

Holding the roll firmly, flip it to your other hand with the raw edges still at the top:

Create a half twist in the fabric and then wrap it around the small roll you created: Continue twisting and wrapping as you work your way around the flower center:

Here's what mine looks like from the top after a few times of twisting and wrapping:

Continue twisting and wrapping until your flower is the size you want it:

When you reach the end of the fabric, your flower should look something like this:

Temporarily pin fabric into place with a corsage pin or long needle:

With the large pin still in place, take a needle and thread and stitch back and forth across the back of the flower. Be sure to catch all the loose layers so they stay in place. (I've used dark thread so you can see what I've done. You will want to use white or ivory thread so it doesn't show):

Here's a look at the very ugly back of my flower, but hey...it's all secure! (p.s. make sure you leave yourself enough thread to tie a knot). ;)

Spritz the top of the flower with Glimmer Mist. Don't overdo it...just 2 or 3 sprays is all you need:

Ta da!! I added a couple of beads to a corsage pin and used it to adorn my flower:

Check back tomorrow for a tutorial on tulle flowers. These are perfect for hair bows as well as scrappy projects!
Labels:
scrapbooking,
Tips
Saturday, May 15, 2010
Cool Stamping Technique
Hello Friends! Long time no see! Life has been crazy as usual, and I know I have lots of posts to catch up on. So watch over the next few days for some updates on what I've been working on.
I wanted to share a cool stamping technique with you that isn't new, but is fun nonetheless. Did you know you can turn nearly any die cut into a stamp? Here are two ways:
On my "Sisters" layout I posted last month, I die cut a flower image and a bird image from Kraft colored cardstock. Then I created a stamp of each image from foam using the technique explained above. I dabbed some off-white paint onto my foam stamp and placed it over the die cut flower. Some of the cardstock still showed in some places where the paint hadn't touched. It left my die cut with a shabby look that I loved!

I repeated the technique with the bird, only this time I used brown paint:
It's so simple and fun to do and adds a little touch to an otherwise boring die cut. Think of all the possibilities! You could create your own custom alphabet stamps, border stamps, and smaller images too.
I wanted to share a cool stamping technique with you that isn't new, but is fun nonetheless. Did you know you can turn nearly any die cut into a stamp? Here are two ways:
- You can use the large AccuCut machines available at many scrapbooking stores (some charge for the use of their machines...just ask what their store policy is). To start, simply die cut images from fun foam and attach them to an acrylic block with double stick tape.
- For personal die cut machines, such as QuicKutz, pull the sticky foam from the metal die and use as your stamp. You can re-foam the die with QuicKutz replacement foam available in 4x4 or 2x2 sizes. Attach the sticky foam to a QuicKutz Rocker handle or acrylic block. Then stamp your image with paint or ink.
I repeated the technique with the bird, only this time I used brown paint:
Labels:
scrapbooking,
stamping,
Tips
Sunday, November 8, 2009
28 Photos!
I've been working on this fun Christmas layout and trying to find a way to put lots of pictures on one page. (I can't be the only one out there who takes a bazillion photos during the holidays, right)? If I counted right, there's 28 pictures on this layout altogether! How do you ask? Well read on...

I started out with little 2x3 photos (Read my last post to find out an economical way to print this many pictures). I created a grid that spanned a two-page layout and filled in the space with 2x3 bits of patterned papers as well as my photos. Then I created a large flap that lifts up to reveal even more!

I was able to showcase everyone in the family this way. It was a lot of work, but I love how it turned out! I used the new Christmas collection by My Mind's Eye and the matching die cut page turned out to be really handy. It included the journaling blocks, title, and little punch-out embellishments that I could fill in empty spaces with. I also used stamps, QuicKutz dies and other flat embellishments. Ultimately, I ended up with lots of journaling space, lots of photo space, and lots of places to embellish. What more could a scrapper ask for? :)
This type of layout would work great for any event where you take lots of pictures or want to summarize a period of time. Think "Year in Review," school, or holiday themes.
I started out with little 2x3 photos (Read my last post to find out an economical way to print this many pictures). I created a grid that spanned a two-page layout and filled in the space with 2x3 bits of patterned papers as well as my photos. Then I created a large flap that lifts up to reveal even more!

I was able to showcase everyone in the family this way. It was a lot of work, but I love how it turned out! I used the new Christmas collection by My Mind's Eye and the matching die cut page turned out to be really handy. It included the journaling blocks, title, and little punch-out embellishments that I could fill in empty spaces with. I also used stamps, QuicKutz dies and other flat embellishments. Ultimately, I ended up with lots of journaling space, lots of photo space, and lots of places to embellish. What more could a scrapper ask for? :)
This type of layout would work great for any event where you take lots of pictures or want to summarize a period of time. Think "Year in Review," school, or holiday themes.
Labels:
Photos,
scrapbooking,
Tips
Thursday, October 15, 2009
Great "How-to" Blog
This is just a quick post to point you in the direction of a great crafty blog I found today. The Pursuit of Craftyness has contributions from some well known designers in the industry. I LOVE the tutorial index you will find down the right side of their blog where you can link to some great step-by-step instructions for anything ranging from how to color felt to making cards from recycled materials.

I really love this post about how to make your own journaling labels. I might have to try that with my QuicKutz dies.
There's some great inspiration there, so take a peek when you have some time! You can also become a fan on Facebook. They have a link on their blog for that as well.
Enjoy!

I really love this post about how to make your own journaling labels. I might have to try that with my QuicKutz dies.
There's some great inspiration there, so take a peek when you have some time! You can also become a fan on Facebook. They have a link on their blog for that as well.
Enjoy!
Labels:
Inspiration,
Tips
Tuesday, September 29, 2009
New Color Tool!
Have you heard about the great new color matching tool offered by Scrapbook.com? It's a really great resource for choosing a color scheme for all your paper crafting projects. There are a few different options when using it.First, you can upload a photo and the tool will give you an idea taking colors from the photo itself. You can choose if you want to use monochromatic, triadic, complementary, etc. You can also choose the option to have the computer show you a simple layout sketch using the photo and the color scheme you choose. If you don't like the initial suggestion, you can click on different colors to change things up.
The second option is to use a color wheel tool without uploading a photo. It's a great way to choose colors for a layout that you might not normally think of. It definitely helps you design outside of the box!
Labels:
Tips
Tuesday, June 2, 2009
New Collections from We R Memory Keepers
I got to play around with a couple of the newest collections from We R Memory Keepers this weekend at Porter's. My favorite of the two was "Grandma's Kitchen." I always seem to gravitate toward more muted colors, and this line fit right in. Buying the 12x12 paper pad is the cool way to go since it also includes glittered chipboard letters, colored alphabet stickers, and a sheet of glittered die cuts. I think it's a great deal!
When you tear a sheet of paper out of the pad, it has an extra white strip at the top with a hole in it for displaying. Well, I inadvertently cut the wrong end of the blue paper off and sort of had a little panic attack for a minute. Then I decided it looked kind of cool and decided to leave it as it was. Sometimes things like that happen, and I'm slowly learning to accept the little serendipity. :) I often like the "accident" better than what I had originally intended!
I had a few customers at the store ask me how I printed my journaling around the scalloped frame. Here's a little trick:
Another cool feature of purchasing the 12x12 paper pad is the two 2-page layout ideas and instructions that are included. I turned one of the ideas into this single page layout to demonstrate how easily in can be customized to fit any number of photos.
The next collection I got to work with was "MVP." It's a great line that is unisex and would work great for any sport. I created this two-page layout for a class I'm teaching next week. Besides the double-sided papers, there are cute $1 stamps, WRMK signature designer snaps, layered chipboard stickers, and a coordinating journaling pad. Some of the papers are printed so they can be cut down into 6x6 squares, making it really easy to create a mini album for your little sports lover.
To see pics of this collection, click here. (You will need to scroll down a bit).
I fully intended on making some more sports pages today, but the kids had different ideas. Hopefully I will have some to show you in the next few days.
I had a few customers at the store ask me how I printed my journaling around the scalloped frame. Here's a little trick:
- In Word, click on WordArt, type the text, and select the font you want.
- After the text appears in your document, click once on the text to bring up the WordArt menu.
- Choose the WordArt shape option. (This is the ABC icon on my computer).
- Choose the circle shape (or any other shape you want). Now you can stretch the circle to any size you want.
- After you have printed it onto the paper of your choice, use a circle cutter to cut out the inside of the frame. I traced the scallops on the outside using some Fancy Pants chipboard as a template.
The next collection I got to work with was "MVP." It's a great line that is unisex and would work great for any sport. I created this two-page layout for a class I'm teaching next week. Besides the double-sided papers, there are cute $1 stamps, WRMK signature designer snaps, layered chipboard stickers, and a coordinating journaling pad. Some of the papers are printed so they can be cut down into 6x6 squares, making it really easy to create a mini album for your little sports lover.
To see pics of this collection, click here. (You will need to scroll down a bit).
Labels:
scrapbooking,
Tips
Subscribe to:
Posts (Atom)