Wednesday, June 3, 2009

Glue Glider Pro

I just discovered a new adhesive that I really like!

I have never been a lover of dispensers...I can't ever seem to get the adhesive to go where I want it to. So I have always used the little squares with the blue tabs that you have to pull off. The blue tabs don't usually bother me unless I'm working on a mini album where it requires lots of adhesive...then they get annoying.

Enter the Glue Glider Pro with Perma Tac. We just received a shipment of these in at Porter's and I tried one out for the first time on Saturday. I was pleasantly surprised! It's way smaller than an ATG gun, therefore more likely to get packed into my bag for a crop. Plus it's not heavy or awkward to hold. The adhesive glides on smoothly and holds really well, even on chipboard. The thing I really like about the adhesive is that it is cut into small segments (1/16") so you can apply a little or a lot. It also rolls around curves easily. When you want to stop rolling, just lift up and it's done...no icky, stringy messes.

Another part I love is how easy it is to refill. There's no need to have an engineering degree to figure out which wheel to thread it onto next. Just slide the entire refill cartridge in and you're ready to go! With 40' of adhesive, you can do lots of scrapping before having to refill again.

The adhesive strip is 1/4" wide which works great for most projects. The one thing that bugs me a little is that the adhesive is closer towards the right side of the roller instead of the left. Since I'm right handed, I have to look from the top of the dispenser to see where I'm rolling instead of just easily seeing from the side. I'm sure with time I'll get used to this and it won't be an issue anymore.

Last, but not least, is the price. At $14.99 for the initial investment of the dispenser + adhesive, the Glue Glider Pro is lots less expensive than the ATG.

So how about it? Has anyone else tried it and if so, what do you think? Would you replace your ATG with the Glue Glider Pro? Let me know what you think!

Tuesday, June 2, 2009

New Collections from We R Memory Keepers

I got to play around with a couple of the newest collections from We R Memory Keepers this weekend at Porter's. My favorite of the two was "Grandma's Kitchen." I always seem to gravitate toward more muted colors, and this line fit right in. Buying the 12x12 paper pad is the cool way to go since it also includes glittered chipboard letters, colored alphabet stickers, and a sheet of glittered die cuts. I think it's a great deal!

When you tear a sheet of paper out of the pad, it has an extra white strip at the top with a hole in it for displaying. Well, I inadvertently cut the wrong end of the blue paper off and sort of had a little panic attack for a minute. Then I decided it looked kind of cool and decided to leave it as it was. Sometimes things like that happen, and I'm slowly learning to accept the little serendipity. :) I often like the "accident" better than what I had originally intended!

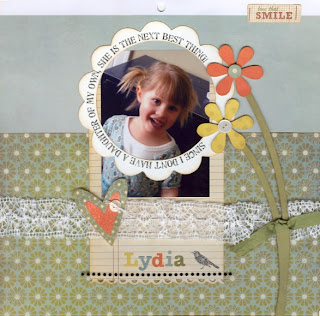
I had a few customers at the store ask me how I printed my journaling around the scalloped frame. Here's a little trick:
  • In Word, click on WordArt, type the text, and select the font you want.
  • After the text appears in your document, click once on the text to bring up the WordArt menu.
  • Choose the WordArt shape option. (This is the ABC icon on my computer).
  • Choose the circle shape (or any other shape you want). Now you can stretch the circle to any size you want.
  • After you have printed it onto the paper of your choice, use a circle cutter to cut out the inside of the frame. I traced the scallops on the outside using some Fancy Pants chipboard as a template.

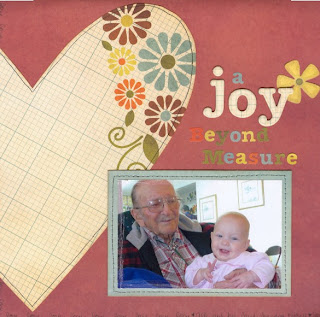
Another cool feature of purchasing the 12x12 paper pad is the two 2-page layout ideas and instructions that are included. I turned one of the ideas into this single page layout to demonstrate how easily in can be customized to fit any number of photos.


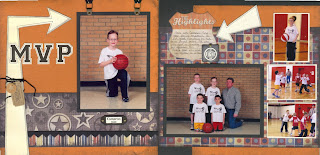
The next collection I got to work with was "MVP." It's a great line that is unisex and would work great for any sport. I created this two-page layout for a class I'm teaching next week. Besides the double-sided papers, there are cute $1 stamps, WRMK signature designer snaps, layered chipboard stickers, and a coordinating journaling pad. Some of the papers are printed so they can be cut down into 6x6 squares, making it really easy to create a mini album for your little sports lover.

To see pics of this collection, click here. (You will need to scroll down a bit).

I fully intended on making some more sports pages today, but the kids had different ideas. Hopefully I will have some to show you in the next few days.

Wednesday, May 27, 2009

Easy Paper Piecings

Have you noticed what's old is new again? Die cuts and paper piecings have made a big comeback in the scrapbooking world. In the past, I never was a fan of the die cut machine. But lately, I find myself creating large embellishments as accents and backgrounds more and more.

With all the personal die cutting machines out there, it's easy to cut a variety of designs in all different sizes. But what if you don't have access to one? Well, here's one solution...use your scanner!

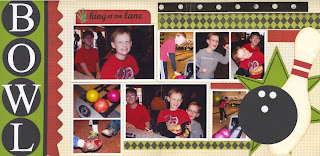
I wanted to make a bowling layout for a class I was teaching and was inspired by a small sheet of Pebbles stickers. I scanned the stickers and enlarged a portion of them to make a pattern for the bowling pin and starburst. I cut the bowling ball with my circle cutter and made the finger holes with a circle punch. What an easy paper piecing!


In this example, I scanned a flower-shaped sanding block and used it as a pattern for my title block. Fast and easy! (If you don't have a scanner, try using a copy machine).


Another solution to easy paper piecing is to use clip art for a pattern. The internet provides us with literally thousands of free images to use.

I created this baseball layout for a scraplift challenge last year. The pattern for the ball came from Microsoft Word Clip Art. I handstitched the threads in the ball with red floss and extended it off the top of the page. It makes a big impact...at a glance, you know what this page is about.


Digital elements and printables are another way to make custom embellishments for a hybrid layout. Because you can change the color and size of the item before printing, the possibilities are endless. A great website to visit is Jen Wilson Designs. She has taken some of the embellishments from the Laundry Line and other paper collections she has designed, and turned them into digital images. You can purchase these accessories for a small price to use over and over again. These journaling dials are some of my favorites:


So the next time you are in need of some inspiration, look around you! Perhaps you can enlarge your favorite flower embellishment that is too small or turn to your old tole painting books for ideas. If you have some creative ways to make inexpensive accessories, please post it here!

Happy Scrapping!

Wednesday, May 20, 2009

I'm Baaaacckkkk!!

We had a great time at the scrapbook conference this past weekend! We laughed a lot (as usual), shopped a lot (as usual), stayed up late (as usual) and some of us (not me) scrapbooked a lot. I managed to teach two classes, make a two-page layout in Wendy's class, and put together one more two-page layout from one of my old kits. Yes...that's it! Actually, I was so scrapped out by the time I got there, it was just fun to socialize and shop.

I had a few kits left over that I will be posting in my Etsy store throughout the next few days. So check in often and see what's new!

This was one of my favorite kits that I designed this time around. I think I might have one or two of them left is all.

I am often inspired by lyrics, and I love the song by 3 Doors Down, "Let me be Myself." I thought it fit perfectly as a theme for teenagers. It's often a struggle to ignore peer pressure and be true to yourself. That is what this layout is about.

Well, that's it for now. Remember to watch my Etsy store for fun things to come!

Saturday, May 9, 2009

Scrapbooking Conference

I have been busy, busy, busy lately getting ready for a scrapbooking conference this next weekend (May 15th and 16th). It's put on by one of my good friends, Cindy Nalder. She owns Cindy's Scrapbooking shop in Malad and has been doing this overnight conference semi-annually for many years. She goes to a ton of work to make it a success. Cindy is pretty much responsible for getting me started with this wonderful hobby, and I never miss this event!

I made this layout a few years ago about some of my scrappin' buds who attended the conference with me. As you can see, we always manage to have a good time. AND we haven't been kicked out of a restaurant yet!

Of course, I never know how to just go somewhere and enjoy myself without eventually turning it into work. It started out with me teaching a couple of classes. Then I began getting requests from people who wanted to purchase layout kits. So I agreed, and for the past 2 or 3 years that's what I have done. Every time I go, I end up selling more and more of them.

So, for this weekend, between the classes I'm teaching there and the kits I'm selling, I have prepared close to 200 kits so far...and I'm not done! (Yes, I 'm beginning to think I'm crazy!) If time permits, I plan on making about 40 more in between working at the lss, shuffling kids to and from school and baseball, helping with homework, trying to cook at least one healthy meal a day, and performing the typical duties of a wife and mother. Sometimes I overestimate myself, so we will see what actually gets done! Thankfully, my family is very understanding this time of year and tries to help out whenever they can. (Hubby is a fabulous dishwasher and cook!)

So, if you are going to be in Southeast Idaho next weekend, come scrapping with us! It's so much fun, just like a girl's weekend out should be. I never get much scrapping done, but we sure do laugh a lot! Here's some more proof:

Mom enjoying room service. I hope I'm still her favorite after posting this lovely photo of her!


Mom, me, and my sis doing a little midnight scrapping. OK, maybe more goofing off than scrapping...I can't tell!


Me and "T", the resident babysitter. The only thing I got done the whole weekend was a mini book that was already half finished! Oh well!

Thursday, May 7, 2009

Mother's Day Mini Album

As promised, here is one of the mini albums I was asked to make for a client for a Mother's Day gift. I used the newest Cosmo Cricket collections "Girl Friday" and "Lil' Man." I really like how they turned out and thought I would share.

The album was made from a 5" tin with an accordion album inside. It ties shut to keep everything tucked in nicely.


I love hiding little elements on a page like this teeny tiny note tucked in the teeny tiny envelope.

I made a pocket to hide 3 photo tags shown below.


And yet another hidden element...a small file folder which contains 3 more photos.


All stretched out...


I love how this album turned out and my client was very pleased! I think I'm going to put a kit together for Etsy. Although it's too late for Mother's Day this year, it would still make a great album for any occasion.

Wednesday, May 6, 2009

New Collections from Cosmo Cricket

I have always been a fan of Cosmo Cricket and two of their newest collections have not let me down! "Girl Friday" and "Lil' Man" are the perfect mix of modern and vintage. The colors and patterns remind me of eras past...therefore, I love, love, love them!

I had a chance to play with them while designing some projects for Porter's. I could use this stuff again and again! The layouts came together fairly quickly (for me quickly is 2-3 hours). And one of the things I love the most is that the two collections can intermix so easily! Besides the double-sided papers, they have a 12x12 sheet of chipboard embellishments, stickers, ribbon, borders, and cut-apart embellishments. Here are some layouts I came up with:


Papers, Chipboard and Ribbon: Cosmo Cricket; Cardstock: ColorMates; Twill: Sweetwater; Floss: DMC

I love the little funny, quirky phrases Cosmo Cricket puts on their barcode strips that you cut off the bottom of their papers. One of the papers happened to be named "Cheerful Charlie." Well, it just so happens that this cute little nephew of mine is also named Charlie. What a coincidence! Of course I had to use that on my page as the perfect way to describe this sweet little guy!


Papers and Chipboard: Cosmo Cricket; Circle sticker: Heidi Swapp; Alpha Stickers: American Crafts; Font: Powderfinger Type; Die Cuts: Accucut

At a recent family get-together, my son sat down on the kitchen floor to play cars with his cousin. Charlie watched and watched and then joined in the fun. They looked so cute together...I couldn't resist snapping their picture!


Paper and Chipboard: Cosmo Cricket; Pin: Fancy Pants; Lace: Making Memories; Felt: Craft Supply; Butterfly Die: Accucut

Now, let's talk about Lydia. Don't let that sweet face fool you. Behind those big puppy dog eyes is a silly little girl who loves hamming it up for the camera. How can anybody resist?!


Papers: Cosmo Cricket; Cardstock: DCWV; Ribbon: Morex, Flower Punches: EK Success

I have been wanting to make this layout for a long time but was waiting for the perfect product to come along. And here it is!

When Cameron was born, I couldn't believe how much he reminded me of my Mom. When he got a few months older, I had his portrait taken and I couldn't believe the resemblence! When you place these pictures side by side, there's no question who's genes this boy has!

Anyway, if you haven't noticed by now, I absolutely love this stuff! I also made some mini albums for a customer for Mother's Day from this collection. I'll post pics of that tomorrow. In the meantime, you've got to get your hands on some "Girl Friday" and "Lil' Man." I would love to see what you have done with it!