Monday, March 30, 2009

Altered Clipboard

I was visiting with a friend the other day about gift ideas for Mother's Day. I mentioned making an altered clipboard and she wanted to see an example.

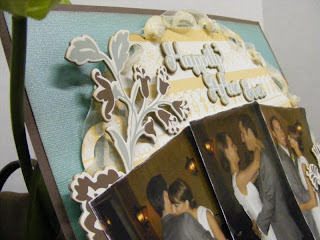
This was one that I made a couple of years ago with the lovely Making Memories Vintage Hip collection. I absolutely loved how it turned out! In fact, it is still displayed in my little scrapbook corner so I can see it everyday. (It was also published in Scrapbook Trends, which turned out to be a total surprise! My friend, Ammie, submitted it and I didn't even know it until she showed me the magazine! Talk about an awesome surprise!)


Anyway, the first step is to paint the clipboard the color of your choosing. On the top of the clipboard, it isn't necessary to paint the entire thing. Just paint about 1" in from the edges...the paper covers up the rest. I always paint the back, because I think it looks unfinished without it.

The trickiest part to embellishing a clipboard is to get the paper to fit around the metal clip at the top. I created a template from plain paper first by laying it over the clipboard and tracing around the metal as best as I could. Then I "cleaned up" the lines by hand and cut around my pattern to make sure it would fit. (Someone out there might have an easier way. If so, please share!) After I was happy with the pattern, I cut it from the patterned paper and attached it to the clipboard with either Mod Podge or ATG.

Next, embellish the clipboard like you would a scrapbook page. I added strips of torn and inked patterned paper, ribbon, a stamped title, and flowers. The funnest part is tying all the little ribbons around the metal clip at the top. I think that just finishes it off nicely!

You can create your clipboard so that a photo is permanently attached like mine is here. Or you can switch your photo out as often as you would like. If you don't want it to be permanent, you might want to choose neutral papers and embellishments so it could fit any number of photo themes.

Enjoy the process of creating! I'm sure any mother, grandma, sister, aunt, or daughter would love to receive a beautiful altered gift!

Sunday, March 29, 2009

Heroes

We are having a 6-Midnight crop at Porter's (the lss where I teach) on April 18th. Everyone who comes gets a great product packet from My Mind's Eye Laundry Line for an incredible price of $10! So this is the layout I created with my share of the supplies:

HEROES


The quote says, "All that we are we will pass on to our children--our loves, our hopes, our dreams, our character. Therefore, let your thoughts be planted in rich soil and let your actions stand tall in a child's eyes. Just as fruit does not fall far from the tree, children do not stray far from their heroes."

A couple of years ago, we had a mini photo shoot at our house. This is a picture of my hubby and the two boys. I hadn't scrapped it yet and thought it went perfectly with this quote.

I sprayed the paper that the poem is on with glimmer mist (that stuff is awesome!) and used a piercer bug to create stitched holes around the top and side of the layout. Lots of distressing and stuff going on here too. I was excited with the way it turned out...hopefully everyone else at the crop will like it too!

Thursday, March 26, 2009

FREE SHIPPING!!!


We all like the word "free"...right? Well right now I am offering FREE SHIPPING within the Continental U.S. and 1/2 PRICE SHIPPING everywhere else on anything in my Etsy shop. Hurry on over! This deal won't last long!

Wednesday, March 25, 2009

Altered Star

This past weekend I altered this large rusty barn star using papers from the Blue Awning collection from K&Co. I love how it turned out! I originally was going to add other embellishments to it, but I decided I liked it just like this.


The large photos are 5x7's and the smaller ones are 4x6's. It was harder to find photos that would fit than I thought it should. Normally I try to crop a photo when I'm taking it to save editing time later. Well, that was my downfall with this star. You need to have a lot of background in the picture showing to allow for the photo to go all the way to the point of the star without someone's head getting cut off. So after a couple of hours (or 3 or 4) I was finally able to find pictures that would work. I think if I were to do this again, it would be easier the second time around.

I have plans to make a smaller star with some heritage photos hanging from the points instead of being mod podged to the star. That will have to happen some other time. Right now I have a class to design and 30 kits to put together.

Happy Scrapping!

Tuesday, March 24, 2009

The Green Stack by DCWV

Who can resist these cute little critters that star on the new "Green Stack" from DCWV? The paper stack by itself is cute, cute, cute. But then I opened up the chipboard embellishments and couldn't wait to use them!

Many times when I open up a large package of embellishments, I use them on a few layouts and then they never get touched again. The thing that I really loved about the Green chipboard is it can be used with so many other papers out there...you aren't limited to matching them up with their own collection of papers. Plus they would make adorable cards. I mean, really...wouldn't it brighten your day to receive a card with these little guys on it?


(Taken from the DCWV website.)


Anyway, here's what I came up with Friday night using a couple of sheets of "Green" paper, some cardstock, Thickers, and other odds and ends embellishments:


This is my niece. She is always cutting her hair...all the way down to the scalp...right in the front. What's up with that? She is a cutie, though, even when she's in trouble!


This is my nephew who was surrounded by 3 sisters for his whole little life and wished and wished for a baby brother. I think he was the happiest boy alive when his wish came true and his little brother was born!


I'm sure I'll be creating more with this line. Here's a closer look at the Green Collection.

P.S. The paper stacks are on sale right now for 50% off at Joann's.

Monday, March 23, 2009

Another font!

I *heart* fonts!

I have at least a bazillion of them on my computer. (Yes, really...a bazillion!) Some I've purchased, but most of them I have downloaded for free from various sites on the internet. I ran across this one today that I just love! I'm always drawn to grubby, grungy, worn looking fonts and this one fits the bill. It's called "You are Loved" and you can find it here.Do you have a favorite font? Leave a comment and let me know. Maybe it's one I don't have yet!

Sunday, March 22, 2009

"Everafter" by Cosmo Cricket

Cosmo Cricket has done it again! I am in love with their "Everafter" collection! The subdued tones of the blues, yellows, and oranges are right up my alley...they are timeless yet trendy.

Although this line is geared towards a love/wedding theme, I found you are not strictly limited to lovey dovey projects. Even the pre-printed borders with all the love quotes on them can be disguised, as I did in this layout about me, my sister, and my Grandma:


I scanned a teeny tiny picture that we found when going through some things of my Grandma's. (The photo was about 1 1/2" square). I fixed it as best as I could without the benefit of Photoshop. I guess the dim quality contributes to the heritage feel of the layout, right?

I also decided to take advantage of the intended use of this collection and create a wedding layout. It turned out to be quite bulky because of all the ribbon and chipboard, but would look gorgeous in a shadow box and given as a gift:


My beautiful niece, Candace, got married last summer. These are some shots my sister took at her reception. I used a large 12x12 die to cut the scalloped paper.


I threaded sheer ribbon through the openings in the paper and tied a knot in every other one. Then I hand sewed crystals to each knot. (It looks so pretty in real life, but unfortunately, photographing these in the basement at the lss didn't do them any justice)!


There! You can sort of see one of the crystals right above the chipboard leaf. Do you see it?

Anyway, when the lss is done displaying these projects, I will have to photograph them again in some better lighting.

To see more of this beautiful collection, visit Cosmo Cricket's website here.

Saturday, March 21, 2009

Sunshine!!!

It is such a gorgeous day today! We have a couple of the windows open in the house, and I actually had to turn the air on in the car on the way home from town. So in honor of this beautiful, warm weather, I listed this cheerful kit on Etsy.


This kit was really fun to make, and I happened to have the perfect pictures of Cam that I took about a year ago. He's such a happy boy! He's always giving me hugs and making me smile.

So anyway...enjoy the kit! I even threw in the little birdie stamp for free because he's so cute and you need to have him! :)

Monday, March 16, 2009

New Etsy Listing!

I just posted this fun Cosmo Cricket layout and product kit on Etsy! The "Cogsmo" line is adorable with all its little robots and gadgets, and I couldn't resist creating some layouts with it.

The thing that's cool about this kit is that you will still have TONS of product left over even after creating these three 12x12 layouts. What could be better than that?!

Saturday, March 14, 2009

More Inspiration

I've been a very busy girl this week in many aspects, but I've also been quite productive with scrapping. I've created a total of 5 layouts and taught one class. I'm gearing up for the spring scrapbooking conference in Pocatello that is sponsored by Cindy's. I'll tell more about that another time.

As promised earlier, I designed another layout with the beautiful BellaBella line from My Mind's Eye. This is for a class that I'm teaching and I'm hoping to have some extras for my Etsy shop. I've been loving the heritage pages lately. It's fun to switch gears between scrapping my boys and then creating pretty pages. It allows me to experiment with different styles and techniques.

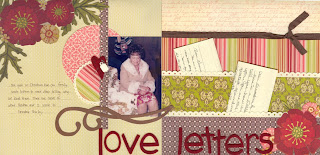
This photo is of my grandmother. I just love it! She looks so sweet standing on a chair in her little boots with all the buttons. I took an exerpt from her personal history where she told how she got her name, Wenonah. My biggest challenge was not having enough room to write all the things I wanted to. I was able to condense it down, though, and it still gets the point across.


I experimented some more with the Bazzill Stitching Templates. I did quite a bit of embroidery on these pages, but surprisingly, it only took about 30 minutes to do. I love the end result! The other nice thing is, there are plenty of leftovers from the die cut sheet to create more projects besides this layout. I guess it gives me even more excuses to use more BellaBella!

Wednesday, March 11, 2009

The Scrap Review

Some of my scrappin' friends pointed me in the direction of this great new blog called "The Scrap Review." They post a new review everyday about a scrapbooking related product whether it's big or small, expensive or inexpensive. I think it's a great resource to check out, especially if you are looking to invest in a new tool or product but aren't sure if it's right for you. They also have tons of giveaways, which can't hurt at all! You just have to leave a comment to be eligible for that day's drawing.

If you have a Facebook account, you can also become a member of The Scrap Review Group. It's open to anyone. They have a discussion board where you can talk with other paper crafters about pros and cons of products out there. Keep in mind that this group was just started a week or so ago so there's not a ton of discussions yet, but it's growing everyday and I've already learned a few things.

So check it out! I fell in love with the Purple Onion Designs Antique Ledger Stamp they featured today. I must head over there now...


Sunday, March 1, 2009

My Etsy Shop is Now OPEN!!!

Well, it's finally here! I'm officially an Etsy seller! I loaded about 7 kits yesterday and have more to come. So without further ado, here's the link to Chasing Paper Dreams on Etsy.

These are the kits I've listed so far:


I would love it if you would share the link with anyone you think might be interested in purchasing scrapbooking kits. They are unassembled but a lot of the cutting and all of the stamping is already done. I have spent lots of time designing them and putting them together and I'm really excited to be able to share them!

If you have any suggestions for me regarding my Etsy store, I would love to hear them. Thanks for taking a peek!